Removing and Post Processing Formlabs Prints
General Overview
For Formlabs SLA printers, finishing usually includes the following steps:
- Washing (either manually with the Form 2/3 Finish Kit and Form 3L/3BL Finish Kit, or automatically with the Form Wash, Form Wash L, or a Formlabs-approved third-party product)
- Cleaning the build platform
- Drying printed pieces
- Post-curing (either with the Form Cure, Form Cure L, or another post-curing solution)
- Removing supports
- Dry sanding, wet sanding, priming, painting parts (optional)
Removing Parts from the Printer
Always remove the build platform first, then remove the resin tank, as this will help to avoid dripping resin onto the glass optical window or into the printer cavity. Close the cover immediately after removing the platform to prevent ambient light from curing the liquid resin in the resin tank and potential contaminants like dust from entering the print area.
Secure the Build Platform on the Jig
Place the build platform on the jig included in the printer’s finish kit.
01
Form 2 and Form 3/3B
02
Form 3L and Form 3BL
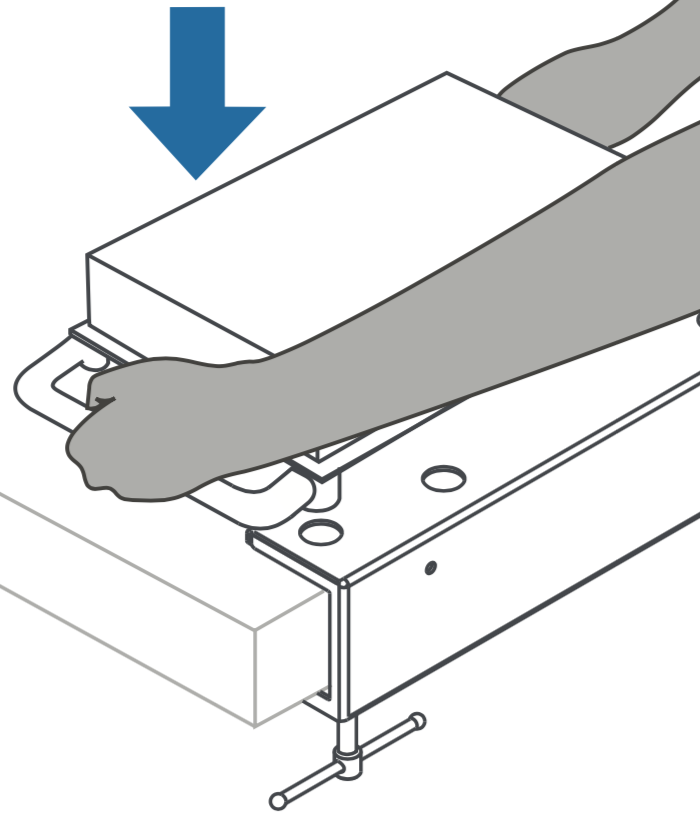
Remove Parts from the Build Platform
To release parts from the build platform, slide a removal tool under the angled edge of the base. Depending on resin type and the geometry of each part, some parts may be easier to remove from the build platform than others.
Tools used to remove parts will scratch the metal surface of the build platform. Scratches are normal and improve part adherence during the initial layers of printing.
01
Form 2 and Form 3/3B
02
Form 3L and Form 3BL

Washing, Soaking, and Moving Parts in Solvent
Isopropyl alcohol (IPA) or tripropylene glycol monomethyl ether (TPM) dissolve liquid resin, making them effective for washing parts printed on Formlabs SLA printers. Two factors—simultaneously soaking and moving parts in solvent—work together to remove the thin layer of liquid resin from the surface of printed parts.
Whether using the Form Wash, Form Wash L, or another washing method, such as the Finish Kit, always consult the support article Form Wash time settings as the primary source of information for up-to-date wash times.
Move Parts In Solvent
Directions for Form 2 and Form 3/3B
Open the first rinse bucket and place the parts in the solvent bath. Use the rinse basket to shake the parts for 30 seconds. This removes liquid resin from the exterior surfaces.
Directions for the Form 3L and Form 3BL
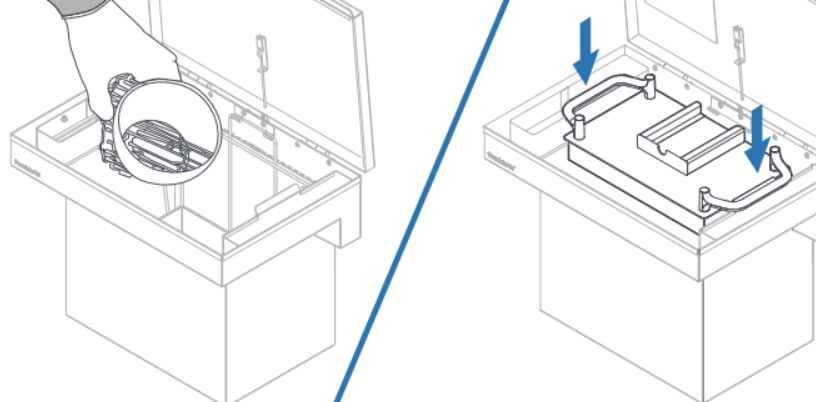
Soak Parts in Solvent
Close the rinse bucket lid and let the parts soak for approximately half the total recommended time.
An easy printable guide for recommended times can be found here.
Repeat with a Second Rinse
Directions for the Form 2 and Form 3/3B
Move the parts to the second rinse bucket, then repeat the movement step, and soak the parts for the remaining time.
Directions for the Form 3L and Form 3BL
Move the parts to the second rinse bucket, then repeat the movement step, and soak the parts for the remaining time.
Drying Printed Pieces
Always let prints fully dry (whether they have been washed in IPA, TPM, or water) before post-curing or post-processing. Forced air, such as a fan or clean compressed air may dry parts more quickly.
For volatile solvents such as IPA, allow parts to dry for at least 30 minutes after washing to allow the solvent to fully evaporate from part surfaces. Ensure appropriate ventilation while the solvent evaporates.
For solvents that do not readily evaporate, such as TPM, let parts drip dry thoroughly and then rinse in water or IPA until all remaining TPM has dissolved.
Cleaning the Build Platform
Always scrape cured resin off the build platform before reusing it. If the next print uses the same type of resin, there is no need to remove liquid resin. Replace the build platform in the printer and start the next print.
If you are switching resin types, or if you do not plan to reuse the build platform right away, clean the build platform with IPA and paper towels to thoroughly remove liquid resin from the build surface and edges. Liquid resin cures in ambient light, and resin left on the surface of a build platform renders it unusable.

Post-Curing Pieces
Post-curing is optional for standard resins. Other resin types require post-curing to achieve their optical-mechanical properties.
Whether using the Form Cure, Form Cure L, or another post-curing solution, always consult the support article Form Cure time and temperature settings as the primary source of information for up-to-date post-cure settings.
Removing Supports
Formlabs recommends removing supports after post-curing, since parts may warp under exposure to light and heat without structural support.
Use the flush cutters included in the finish kit to carefully cut the supports attached to the parts. You may also use a scalpel or hobby knife to remove supports.
For parts with complex or delicate geometries, refer to the support article on advanced support removal.
Sanding, Priming, and Painting Parts (Optional)
After removing supports, remove support marks by dry sanding or wet sanding. Depending on the part’s application and desired finish, further post-processing steps may include priming and painting prints.