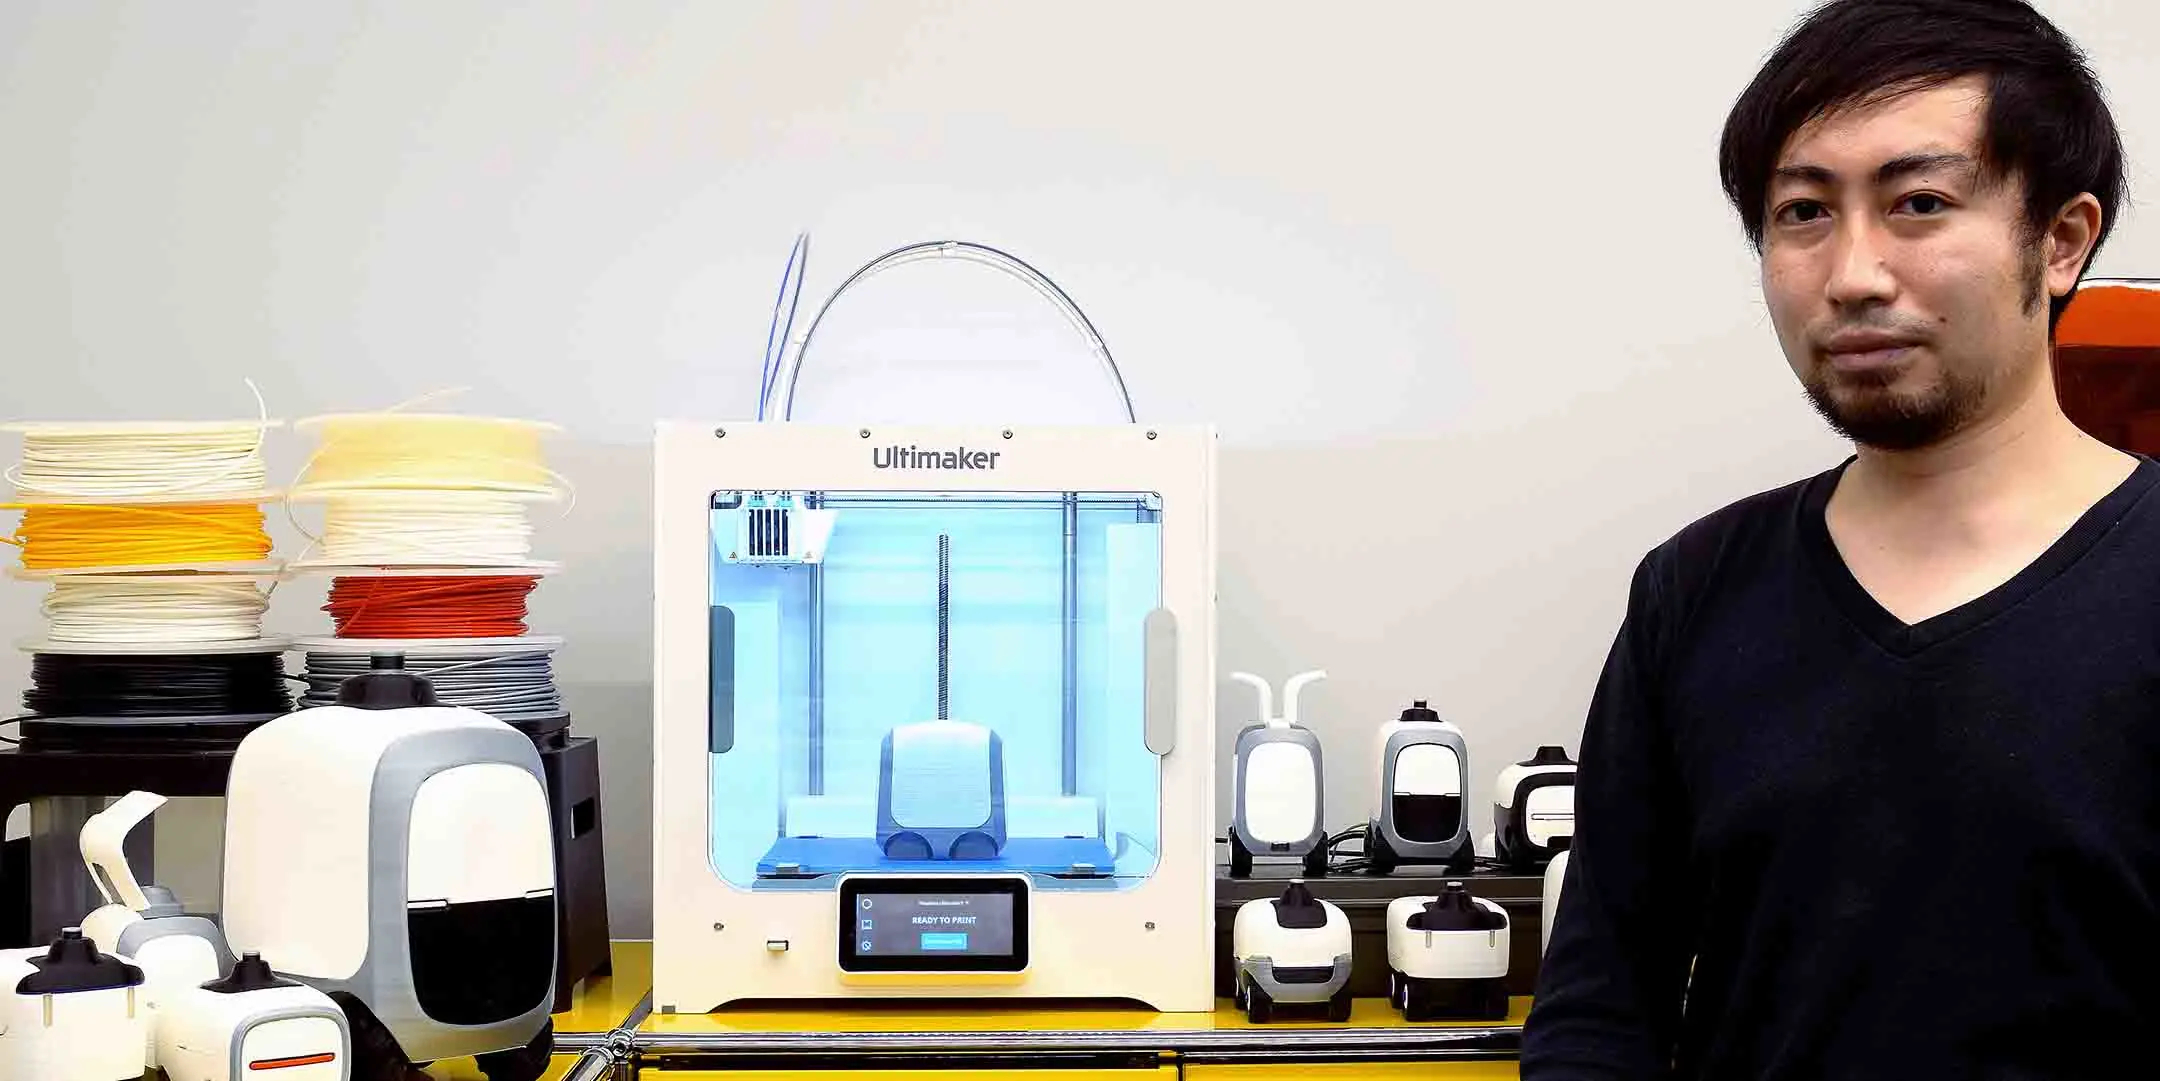
Yasuhide “Yasu” Yokoi is the cofounder of design and technology firm Final Aim Inc., which works with laboratories, startups, and multinational companies to transform ideas into tangible solutions. There, he and his team use Ultimaker 3D printers to better enable rapid design iterations during the prototyping phase.
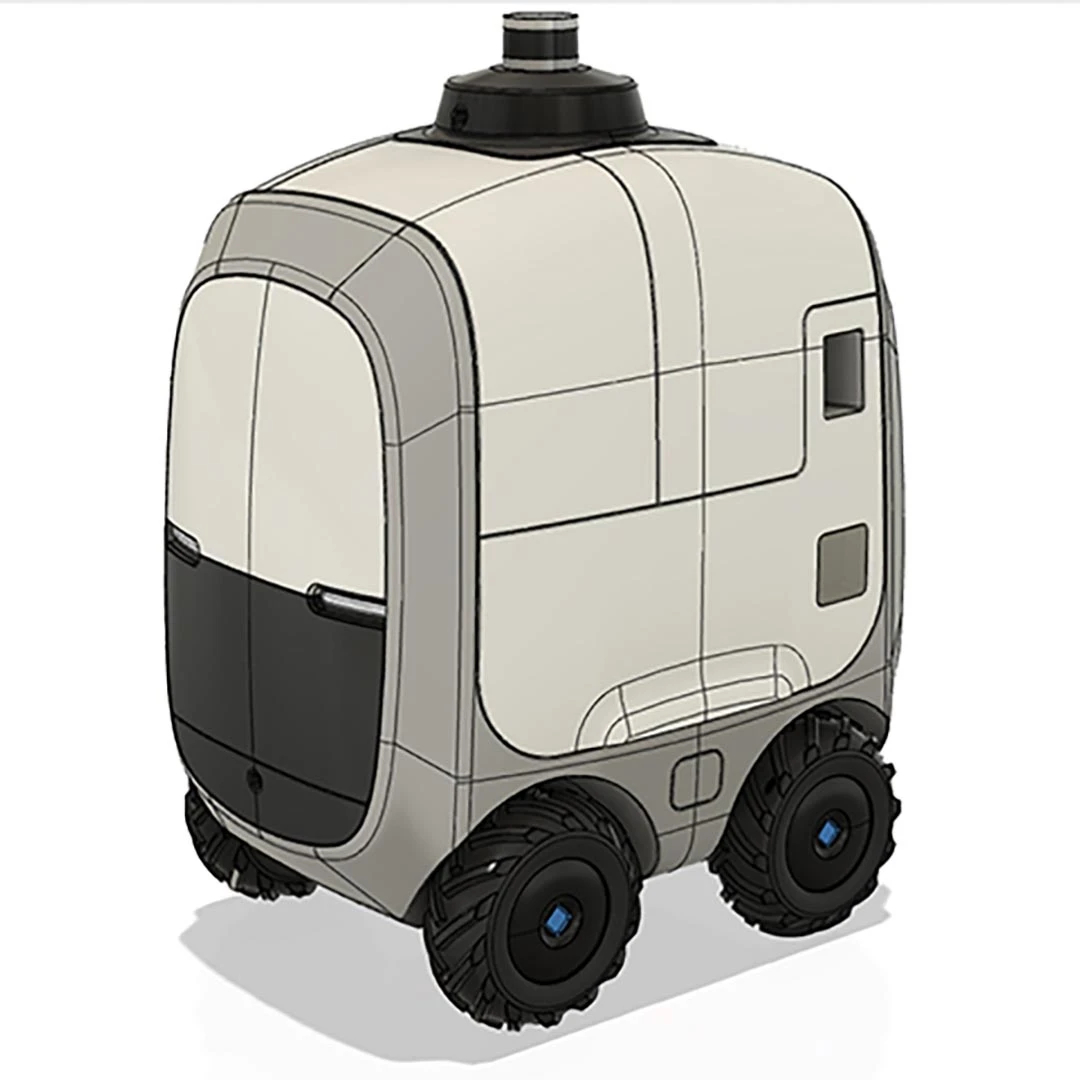
One of the company’s latest projects is the OSTAW Camello, an autonomous package delivery robot.
Revolutionizing Package Delivery
The Camello was designed to address issues in the delivery logistics chain in Singapore, which causes high shipment costs and operational complexities. Due to low loads and long waiting periods in loading and unloading bays, package deliveries are often inefficient – a fact exacerbated by high delivery volumes and tight delivery deadlines.
To tackle this challenge, Final Aim collaborated with a Singaporean robotics start-up OTSAW Digital PTE LTD, with the Camello being the final product.
The Camello is user friendly, featuring an ergonomic cargo space and sleek design – optimal for Singapore’s urban environment. Plans are currently underway for it to be used by various industrial key players, delivery companies, and retailers throughout Singapore, creating an improved ecosystem that provides smooth and efficient delivery to customers, while increasing profit margins for those businesses that use it.
The Birth of the Camello
As with any product, several phases were involved in Camello’s design, with the Ultimaker S3, Ultimaker Cura, and CAD software acting as Yasu’s and Final Aim’s greatest companions throughout the process.
First came the robot’s concept development and evaluation. From the initiation to ideation, he used both hand-drawn design sketches and CAD software.
Industrial designer Yasuhide Yokoi with the Ultimaker S3 and Camello prototypes
Once he developed the idea, Yasu began the process of presenting it to the higher-level management, frontline members, and end-users. This divergent approach allowed Yasu to gain as much feedback as possible, which he could then use to refine, improve, and further flesh out his concept.
Early sketches of design ideas
A CAD design iteration, which can be 3D printed
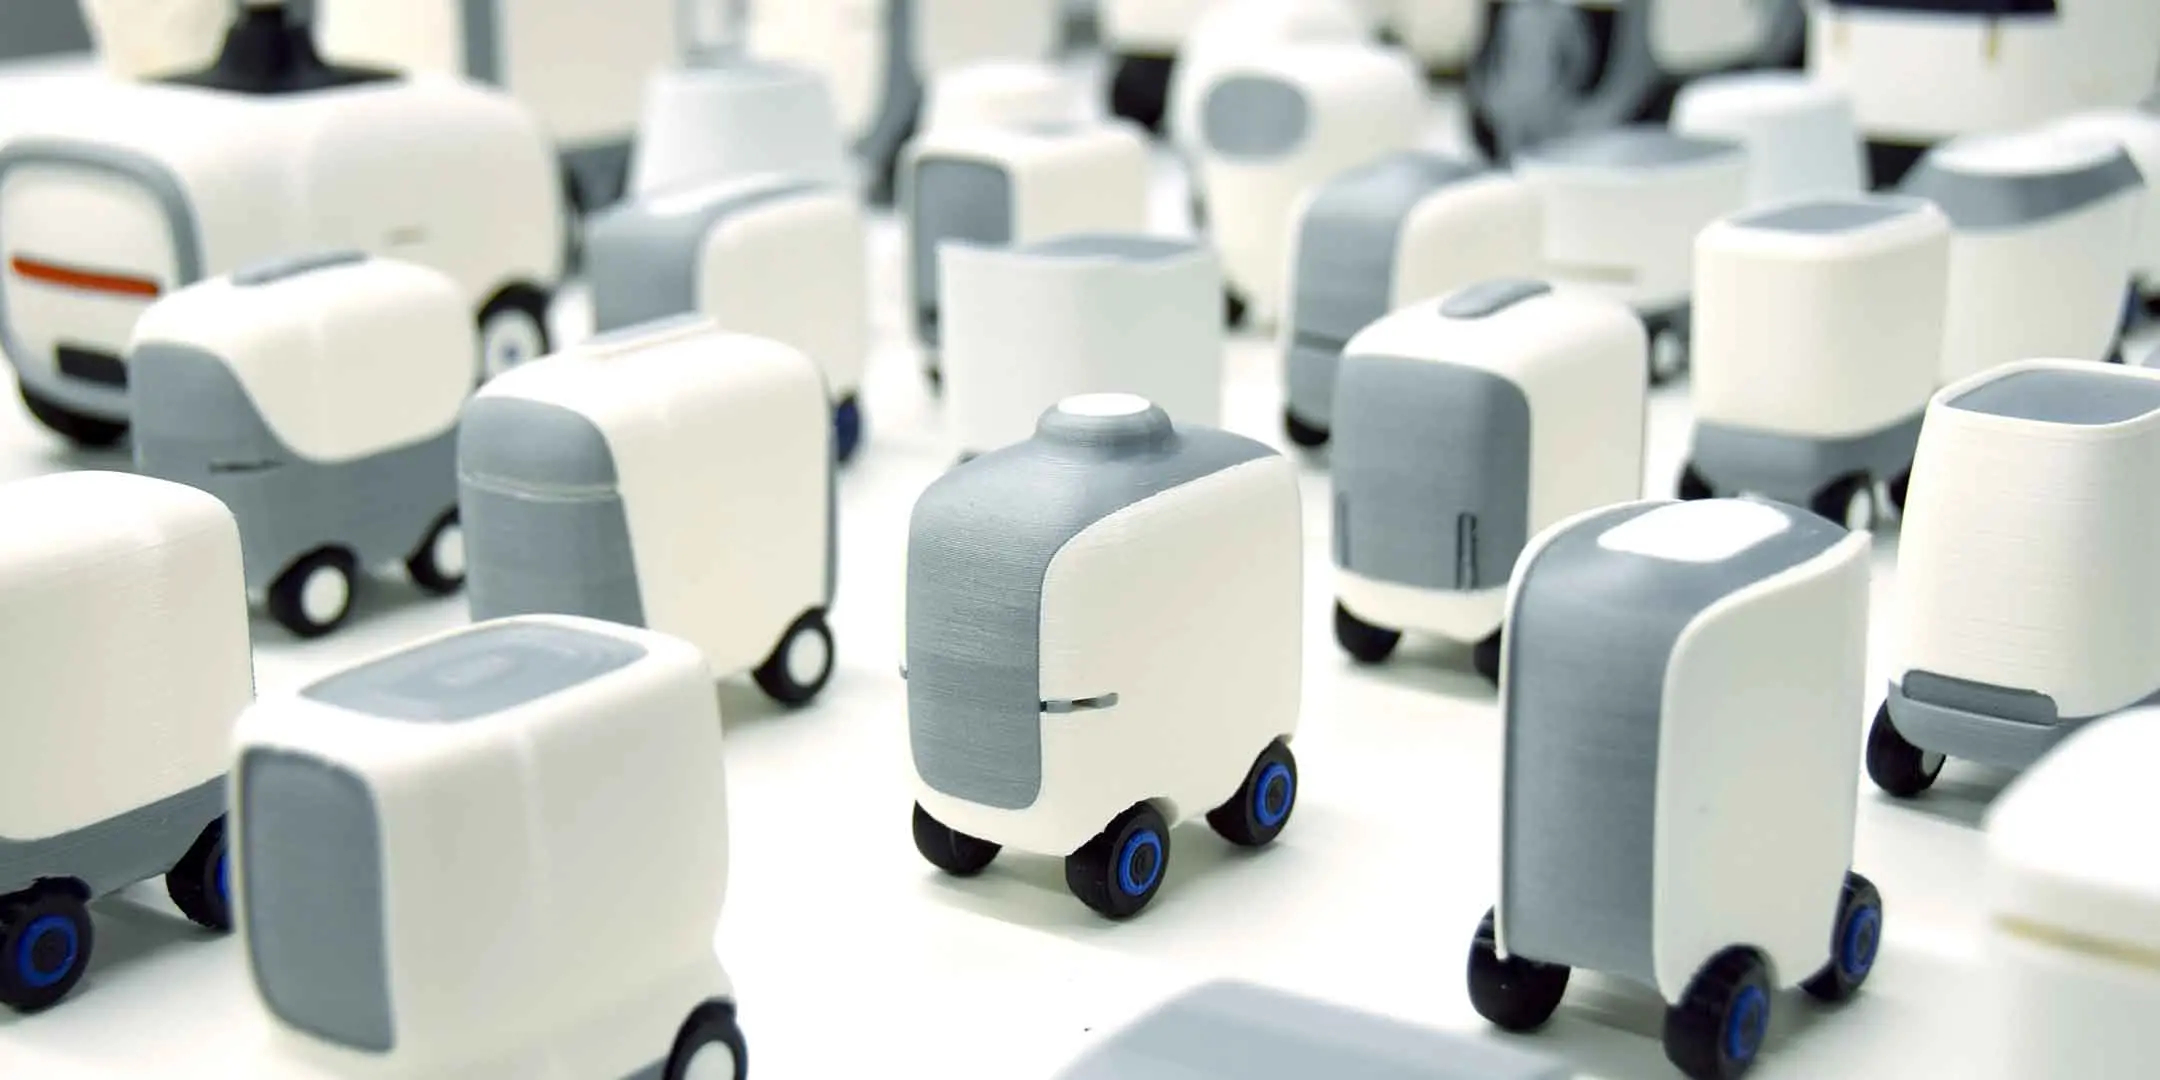
Next came the prototyping phase. As Yasu now had numerous potential ideas, he needed to rapidly actualize them – often on tight deadlines. Luckily, this was a task that 3D printing was able to easily handle. Compared to other common prototyping methods such as sculpting or carving from Styrofoam, chemical wood, or industrial clay, 3D printing is much more efficient – freeing up time for Yasu to work on other design tasks.
“More than just cost-cutting, 3D printing has added value to my process,” Yasu said.
3D printed iterations of the robot, ready to be tested and compared
Finalizing an Intuitive Design
Yasu was also responsible for ensuring that the Camello’s final design was of excellent quality. As his works often incorporate organically curved surfaces and silhouettes, which are often difficult to implement, he needed to create numerous iterations. 3D printing technology utilizes the contour layers of printouts to analyze the curvature of surfaces – essentially an equivalent to the zebra mapping that CAD software performs.
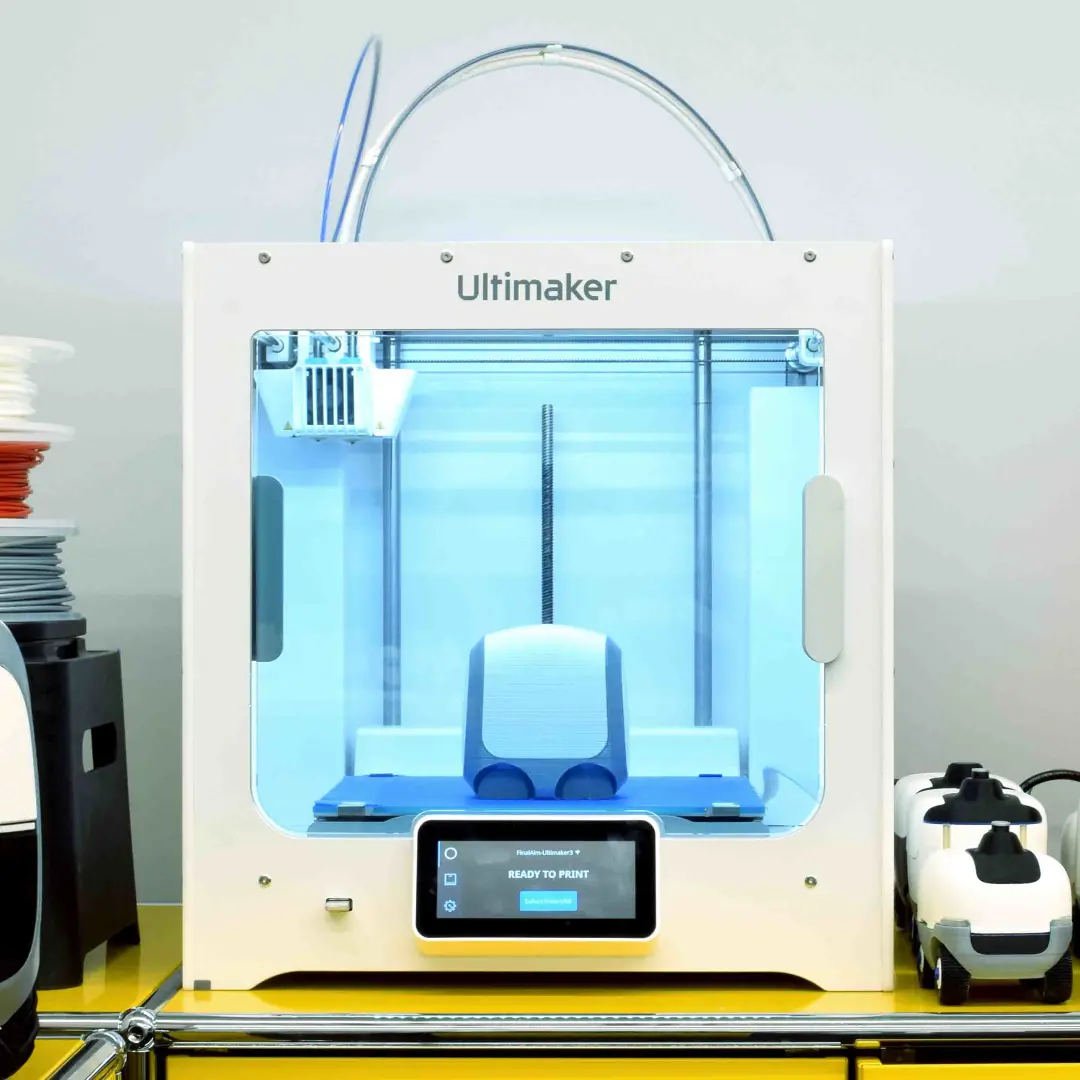
“The Ultimaker S3’s double extrusion feature has [also] been essential to my everyday design applications,” Yasu said. “Together with Breakaway and PVA material, my printing experience has become exponentially more efficient. I am deeply satisfied with the resulting quality as it leaves behind no support structure remaining.”
Final design iteration prototyped on the Ultimaker S3
Production Camello delivering groceries in Singapore
For the Camello to be a success, its design had to be intuitive and accessible at first glance. The design process, therefore, involved divergent ideation, exploring all possibilities, which were then carefully narrowed in focus. Development speed was also critical for stakeholders’ requests.
3D printing enabled these stakeholders to see and touch a physical product, deepening their understanding of the Camello’s concept and design – and streamlining the decision-making process.
Go To Market Faster
Discover how 3D printing can accelerate your development cycles, with insights including:
If 3D printed parts are intended for food contact items, you‘ll have to consider safety practices and regulations to avoid contact with toxic substances and prevent the buildup of harmful bacteria. Food safe 3D printing is possible and the variety of materials approved as food safe is increasing, but there is a high degree of ambiguity around the workflows and finding the appropriate applicable regulations can be a challenge.
Read on for an introduction to food safety, food safety considerations for 3D printing, and a variety of methods to produce food safe products with common 3D printing processes, including stereolithography (SLA), fused deposition modeling (FDM), and selective laser sintering (SLS).
To begin, it’s important to clarify a few key terms:
Food grade means that the material is either safe for human consumption or permitted to come in contact with food.
Food safe means that a food-grade material meets the requirements determined by the intended use and will not create a food-safety hazard.
Food contact surfaces include any surface that may come into direct contact with food. These surfaces must be made of non-toxic materials and designed to withstand the environment of their intended use, including exposure to cleaning compounds, sanitizing agents, and cleaning procedures.
Food grading and food safety concern a specific way to ingest parts, called migration. Particles as small as a few nanometers and up to several hundred nanometers may get transferred each time various materials encounter with each other, for example from components of the 3D printer to the 3D printed object, and from the object to the food.
Because migration levels are very low on occasional contact, food grading typically concerns items that are in prolonged contact with food such as containers, straws, utensils, plates, and food molds. Different testing institutions will adhere to different government-imposed risk tolerances and approved substances, which for the US is described by the FDA CFR 21 and for the EU in guidelines 10/2011.
To be considered food safe according to the FDA Food Code, a material has to meet the following requirements:
No migration of deleterious substances
Does not impart colors, odors, or tastes
Safe under normal use conditions
Durable, corrosion-resistant, and nonabsorbent
Sufficient in weight to withstand repeated washing
Finished to have a smooth, easily cleanable surface without breaks and sharp internal angles
Resistant to pitting, chipping, crazing, scratching, scoring, distortion, and decomposition
Accessible to inspection
Any FDA or EU approved material includes not only the raw polymer but also the additives or masterbatch. These might contain components such as plasticizers, impact and heat distortion modifiers, UV-stabilizers, flame retardants, anti-fouling, anti-static, anti-slip, foaming and clarifying agents, anti-oxidants, aromatic nucleators, carbon alloys, phosphorescents, fillers, thickeners, chain extenders, metal deactivators, dyes, and a carrier resin.
General Food Safe 3D Printing Considerations
Bacteria Buildup
A 3D printed part can turn into a petri dish squirming with bacteria within weeks. Even though some materials will survive the dishwasher, so will dangerous bacteria such as E. coli and salmonella that live in the little nooks and crannies. Some toxic molds find favorable growth conditions on several types of plastic and are hard to remove. Neither cleaning with bleach nor microwaving your polymers is an option for eliminating germs.
While bacteria buildup might not be an issue for disposable items, if you’re planning to create a part for long-term use, using a food-safe coating is highly recommended.
Food Safe Coatings and Sealants
The best option to reduce the risk of particle migration and bacteria buildup is by dip coating the 3D printed parts with a food grade epoxy or polyurethane resin, such as Masterbond’s EP42HT-2FG or ArtResin or an FDA approved PTFE (known as Teflon®) to seal their surface.
However, note that coating also doesn’t guarantee food safety for prolonged use as not all of these coatings are dishwasher safe, and they may degrade over time, exposing the original, potentially non-safe surface.
Dishwasher Safety
Most 3D printing materials have a low heat deflection temperature (HDT), which means that the 3D printed parts might become brittle and crack, or deform and warp at elevated temperatures. If you’re planning to clean a 3D printed part in a dishwasher, make sure to double check that the material is dishwasher safe and if there are any specific recommendations for washing temperature.
Food Safe Equipment
As particles might migrate from components of a 3D printer to 3D printed parts, it is crucial that any components that might come in contact with the 3D printing material or the part are food grade and do not contain or leach harmful chemicals.
This includes taking precautions when using multiple materials, as some materials previously used in the 3D printer might have contained toxic particles and made contact with some components.
Food Safe 3D Printing Materials
Many 3D printing materials are not food safe and might contain toxic chemicals. Only use materials to 3D print parts intended for food contact that are certified for food safety.
Food Contact Time
As may be expected, the risk of migration is higher if the food is exposed to the 3D printed part for an extended time period. In general, try to limit food contact time and take further precautions for parts that will be in contact with food for longer periods of time.
Using 3D Printing to Create Food-Contact Items
Think about the reason why you’d like to use 3D printing for a food-contact item. If it’s to create custom shapes and forms, in most cases, there are indirect ways to use 3D printing to create these custom parts, for example with molding. See an example in the next section.
Food Safe 3D Printing With Stereolithography (SLA)
SLA 3D printing uses a laser to cure liquid resin into hardened plastic in a process called photopolymerization, resulting in parts that have the highest resolution and accuracy, the clearest details, and the smoothest surface finish of all plastic 3D printing technologies.
Is resin food safe? The answer is no. Substances may migrate from SLA parts which makes none of the resins and printed parts food safe by default. While some resins for dental and medical applications are certified biocompatible, that doesn’t mean that they’re food safe. These materials are certified for specific applications and should not be used for food contact products.
SLA parts have a smooth surface finish that makes it easier to use coatings to seal their surface and prevent the buildup of bacteria. The factors which affect the ultimate smoothness of a part include resin type, layer thickness, build orientation, mesh triangulation resolution of the 3D model, and the curing profile of the SLA resin. Printed parts require washing and post-curing according to the manufacturer’s instructions before the coating is applied. However, note that coatings don’t guarantee food safety, as the coating may interact with the resin or degrade over time, exposing the original, potentially non-safe surface.
Molds
Creating custom molds is a common way to leverage the benefits of SLA 3D printing to produce highly detailed custom parts without having the 3D printing parts come into direct contact with food. While SLA 3D prints aren’t suitable for directly molding foods, SLA 3D printers are perfect tools to create mold negatives, which can be vacuum formed using food safe plastic.
The tools and techniques for creating 3D printed food molds are easy to master, and the results are often stunning.
Electroplating
Electroplating is the process of coating parts with metal using an electric current. The process is most commonly used for decorative purposes or to prevent corrosion by creating a durable surface.
SLA parts are ideal for electroplating due to their smooth surface finish. However, as plastics are nonconductive surfaces, SLA 3D prints have to be rendered conductive by coating with graphite, conductive lacquer, electroless plate, or a vaporized coating.
Food safe metal coatings are available, but as the process involves various chemicals, making sure that the workflow is approved for food contact is the developer’s own liability.
Ceramics
SLA 3D printing offers the unique possibility to produce ceramic parts. After 3D printing, parts can be fired in a kiln to burn out the resin and form a true ceramic part that is strong and heat-resistant. With subsequent food safe glazing, the parts will become more hygienic and resistant to most chemicals.
A variety of food-safe glazes are available on the market, but make sure to follow the manufacturer’s instructions in accordance with food safety guidelines.
Food Safe 3D Printing With Fused Deposition Modeling (FDM)
FDM is a 3D printing process that builds parts by melting and extruding thermoplastic filament, which a print nozzle deposits layer by layer in the build area.
The extruded material is circular in cross-section, which leaves very narrow crevices in between layers with a depth directly proportional to layer height. It is recommended in any case to print at the lowest feasible layer height for food safe parts.
Consequently, the main challenge with FDM parts is avoiding the buildup of bacteria. To be truly food safe in the long term, an FDM 3D print needs to have a smooth surface. Chemical smoothing with solvents like acetone, d-Limonene, or ethyl acetate removes many of the irregularities of the print resulting in a smooth, glossy appearance. However, applying a subsequent food-safe coating is still highly recommended.
Layers of an FDM print.
Layers of an SLA print.
Food grade filaments do not contain any composite particles so will not wear down the nozzle into the print. Nevertheless, avoid brass nozzles that contain lead and use a dedicated stainless steel nozzle instead for all food contact items.
Always check the compatibility of your 3D printer’s components with the filament. For example, PEI is a material that is FDA compliant and offers great mechanical benefits but needs to be processed at over 300 °C, which requires a specific printer solution.
Food Safe FDM Materials (Food Safe Filaments)
The most common questions around FDM food safety concern two popular materials. Is PLA food safe? Is ABS food safe? The answer is, it depends.
Food safe 3D printing filaments include PLA, PP, co-polyester, PET, PET-G, HIPS, and nylon-6, as well as some brands of ABS, ASA, and PEI. Having to run parts through the dishwasher rules out PET, nylon, and PLA because these plastics soften and distort around 60–70 °C. For applications involving hot liquids, co-polyester, High Temperature PLA or PEI are most suited.
While not reflected in the regulations, some studies suspect that polystyrene may leach styrenes, co-polyesters might cause health concerns and that food-grade FDM filaments might lose their safe status due to oxidation and thermal degradation from the printing process.
FILAMENT
MNFG BRAND
FDA RECOMMENDATIONS
SMOOTHABLE
DISHWASHER SAFE
ABS
Adwire PRO
Approved
Yes, acetone
Yes
Innofil3D
Approved except red, orange, and pink
Yes, acetone
Yes
ASA
Innofil3D
NA
Yes
Bendlay
Orbi-Tech
NA
Yes, brake cleaner
No
Biocompound
Extrudr GreenTEC
NA
Co-Polyester
Colorfabb XT
Approved
No
Yes
HIPS
Easyfil
Compliant
Yes, d-limonene
Yes
Fillamentum
NA
Yes, d-limonene
Yes
InnoFil3D
Approved
Yes, d-limonene
Yes
Nylon
Taulman Nylon 680
Compliant
No
PEI
ULTEM® 1000
Compliant
Yes
PET
InnoPet EPR
Approved except red and orange
Yes, ethyl acetate
No
Refil
Approved
Yes, ethyl acetate
No
Taulman T-Glase
Approved
Yes, ethyl acetate
No
Verbatim
Compliant
Yes, ethyl acetate
No
PET-G
Extrudr MF
NA
Yes, ethyl acetate
No
HDGlass
Approved
Yes, ethyl acetate
No
PLA
Filaments.ca TrueFS
Approved
No
No
Fillamentum
NA
No
No
Innofil3D
Approved except red, orange, pink, apricot skin, grey, and magenta
No
No
Copper3D PLActive Antibacterial
Approved
No
No
Makergeeks
Approved
No
No
Purement Antibacterial
Approved
No
No
PLA-HT
Makergeeks Raptor
Approved
No
Yes
Makergeeks Raptor
Approved
No
Yes
PP
Centaur
Compliant
No
Yes
InnoFil3D
Approved
No
Yes
Nunus
Compliant
No
Yes
Verbatim
Compliant
No
Yes
SBS
Filamentarno
NA
Yes, d-limonene
Yes
Food Safe 3D Printing With Selective Laser Sintering (SLS)
Selective Laser Sintering is a 3D printing process that use a high-powered laser to fuse small particles of polymer powder. The most common material for laser sintering is nylon, a popular engineering thermoplastic with excellent mechanical properties.
While some SLS powders are graded food safe, the particles on the surface of printed parts might not fuse completely, resulting in parts that are inherently porous and do not deal well with moisture and mold growth. Even though the nylon 12 powder can be steam cleaned in an autoclave, it is best to coat SLS parts with food-safe coatings to seal their surface.
Conclusion and Further Reading
Food safety with 3D printing is not a simple matter that will boil down to a clear yes or no answer. Producing 3D printed parts for food contact items requires careful consideration of the risks depending on their intended use.
For further information on food safety and 3D printing, we recommend reading the following:
Whether you’re eagerly awaiting the arrival of your new printer, looking for the quickest way to get started, or troubleshooting an issue, we have a variety of guides and tutorials available here.
Whether you’re eagerly awaiting the arrival of your new printer, looking for the quickest way to get started, or troubleshooting an issue, we have a variety of guides and tutorials available here.
Before printing can begin, the printer must be completely level. This built-in check ensures that resin is dispensed correctly and the printer does not overfill the tank. Leveling may be necessary during the initial printer setup, or after moving the printer to another location.
Navigate To Leveling Procedure
First ensure your printer is on a stable level surface.
Next power on your printer and allow it to boot completely
Navigate through the screen to one of the following:
On a Form 2, tap the printer icon on the home screen. The Your Printer screen appears. Tap Settings > Printer Leveling.
On a Formlabs LFS printer (Form 3 and newer), tap the printer icon on the Home screen. Tap Settings > Maintenance > Printer Leveling.
Select Foot to Level
When the printer is not level, the dot at the center of the concentric rings shifts out of place. A printer foot is highlighted with an arrow indicating the direction to turn.
Raise or Lower the Leveling Foot
Slide the leveling disc included with your printer around the foot indicated on the printer’s touchscreen. Rotate the leveling disc clockwise to raise and counter-clockwise to lower each foot of the printer.
Note: For an absolutely perfect level, you may be required to adjust multiple feet.
Verify the Leveling Process
When the dot is at the center of the concentric rings and the four dots around it turn blue on the printer’s touchscreen, the printer is level.
This page will allow you to learn the best practices to set up and use the Form 3/Form 3B and its Resin Tank, Build Platform, and resin dispensing system. Reference the quick link section to the right for specific procedures in the setup process.
Printer Components
Take a moment to get to know the different parts of your printer. These terms will be used regularly throughout support documentation. a
Resin Cartridge
Status light
Cover
Build Platform
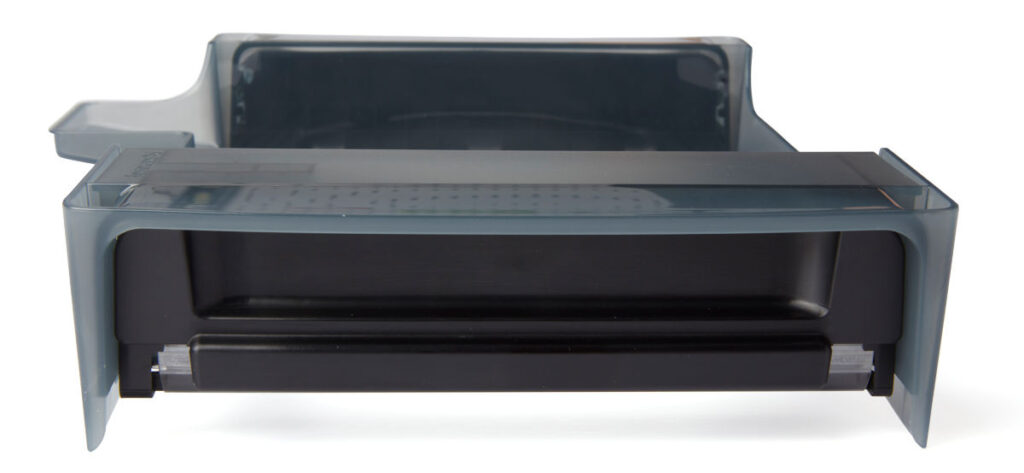
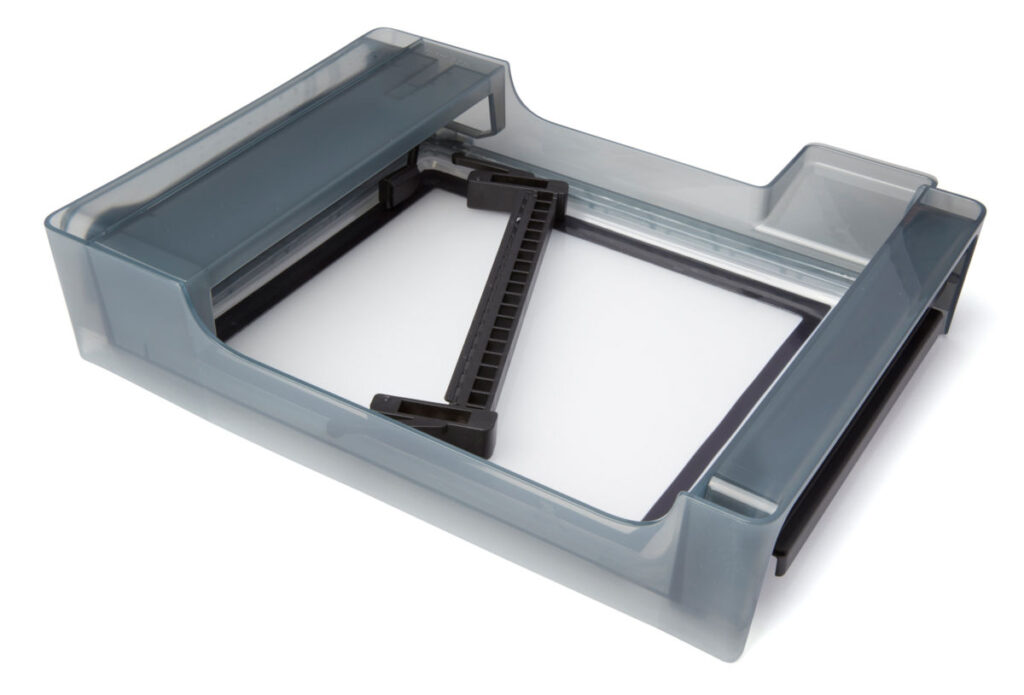
Resin Tank
Touchscreen
Status light
Leveling disc
Unlocking the Light Processing Unit (LPU)
A latch secures the Light Processing Unit (LPU) within the printer during shipping. To release the LPU housing from its shipping position:
01
Locate the latch (A) on the LPU housing.
02
Loosen and remove the thumb screws (B) and LPU latch.
03
Store the thumb screws and latch with the original packaging. The LPU must be secured with the thumb screws and latch during any printer transportation.
Powering the Printer On
The first time the printer is connected to power, it will display a series of onboarding steps on the touchscreen. The onboarding steps include instructions for inserting consumables (resin tank, resin cartridge, and build platform) into the Form 3/Form 3B, additional details for which are given below. Follow these steps to prepare the Form 3/Form 3B for use.
Inserting the Resin Tank
The resin tank is the primary container for holding resin after it is dispensed from the cartridge. Resin is cured onto the build platform when the laser passes through the tank’s bottom film. To insert the resin tank:
01
Lift the printer’s cover and remove the resin tank from its case.
02
Remove all packaging from the resin tank before inserting it into the printer, including the foam inside the resin tank that holds the mixer in place.
03
Align the resin tank side walls with the left and right tank carrier rails. The front and rear walls of the resin tank should hang over the ends of the rails and the tank’s resin fill spout should fit into the corresponding hole in the Z tower. The tank is not locked into place in this position but should sit flat and level.
04
Holding the side handles on the tank, gently push the tank down and forward until it locks into the rails and is flush against the back of the printer. You should not need to apply significant force. The printer will not properly detect the tank unless the tank is fully inserted NOTE: If the printer is powered on, it will display a message on the touchscreen and play a notification sound once it detects the tank. The status light on the top of the printer and the logo on the front of the printer will also flash to show that a tank has been detected.
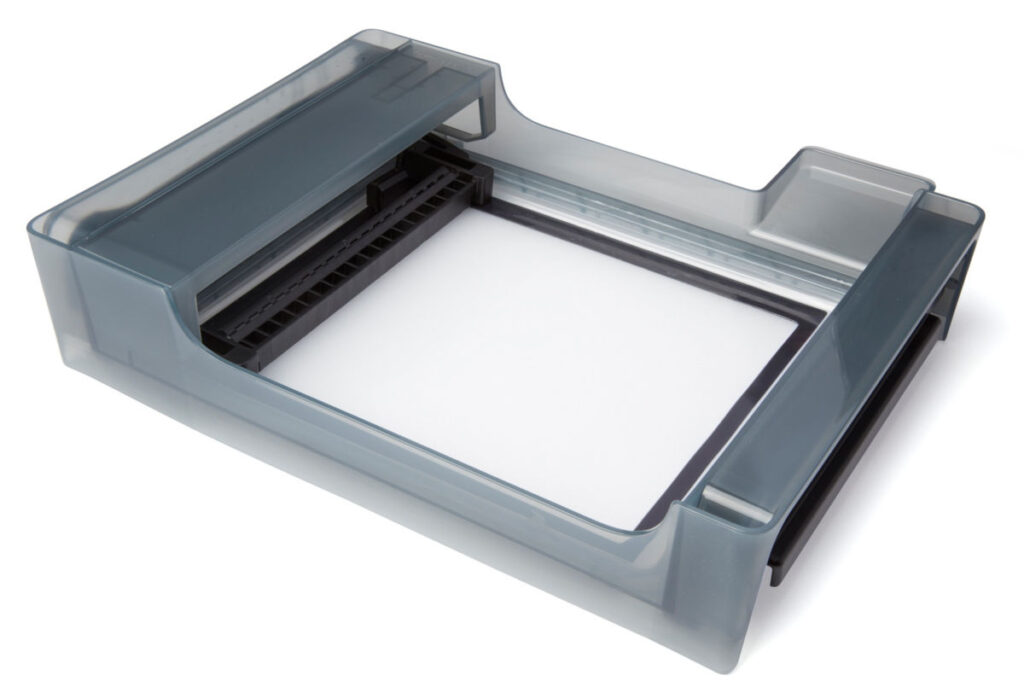
Insert the Mixing Arm
Each resin tank includes a mixer that improves print consistency by clearing the build area and circulating the resin. Scrapers on the top and bottom of the mixer clear the build platform and film, respectively. To insert the mixer:
01
Orient the mixer with the flexure arms facing upward and toward the float case on the left side of the tank. The magnets in the mixer should be facing down.
02
Slide the mixer to the left, into the float case, until the flexure arms on each end click into place.
Inserting the Build Platform
The build platform is the surface that each part prints onto. To insert the build platform:
Lift the build platform carriage handle.
Align the build platform with the build platform carriage and push into place.
Lock the handle down to secure the build platform.
Preparing the Resin Cartridge
The resin cartridge stores resin to be dispensed into the resin tank. To prepare the resin cartridge:
Shake the resin cartridge to ensure the resin is well-mixed.
Shake the resin cartridge approximately every two weeks to keep the formula well-mixed for the best print quality.
Remove the protective valve cover from the underside of the cartridge.
Consider saving the cover to protect the valve during storage.
Inserting the Resin Cartridge
To insert the resin cartridge:
Align the cartridge with the opening at the back of the printer.
Push down on the cartridge handle until the top of the cartridge is level with the back shell of the printer.
Press open the vent cap before starting a print so that the resin tank fills correctly.
Preform is the software provided by Formlabs that will convert your model file into machine directions to create your print. These machine instructions are produced automatically, based upon user configurable options.
Always remove the build platform first, then remove the resin tank, as this will help to avoid dripping resin onto the glass optical window or into the printer cavity.
The printer’s touchscreen displays error messages if the printer encounters any abnormalities and displays more details about the error. This page will cover warning messages along with what you will need to do when one presents itself on the Form 3/3B.
Diagnostic Logs
Formlabs printers maintain diagnostic logs to provide detailed information about the printer. Include these diagnostic logs with other relevant observations and details when contacting Formlabs Support or your authorized reseller to speed up resolution.
For printers connected to the internet over an active Wi-Fi or Ethernet connection:
Tap the wrench icon on the bottom left of the printer’s Home screen. The Settings screen appears.
Tap System. The System screen appears.
Tap Upload Diagnostic Info. A confirmation message to upload diagnostic information appears.
Tap Next to start the upload. A confirmation message appears when the upload is complete.
If the printer displays an error message indicating that it cannot upload the logs, there may not be enough storage space on the printer for the upload. Delete print jobs from the Queue to clear enough storage space to upload the diagnostic logs.
Restart the printer and try again.
For Printers Not Connected to the Internet:
Open PreForm.
Click File > Printers in the menu bar. The Printer List window appears.
Select the printer’s serial name. The Printer Details window for the selected printer appears.
Click Download Logs. A confirmation window appears.
Click Browse to download the diagnostic logs to a preferred location on your computer.
Click OK. The diagnostic logs save and appear in the encrypted FORMLOGS format.
Attach the file when contacting Formlabs Support or your authorized reseller.
If PreForm displays the message ERROR_BAD_STATE, there may not be enough storage space on the printer for the upload. Delete print jobs from the Queue to clear enough storage space to upload the logs.
Restart the printer and try again.
Cartridge Dispense Error
The printer displays Cartridge Dispense Error if it tries to dispense resin but nothing comes out of the cartridge. Usually, this means the cartridge is empty. Each cartridge contains and can reliably dispense one liter of resin. After the full liter dispenses, dispose of the cartridge and continue printing with a new cartridge.
If a cartridge is not empty but the printer is unable to dispense resin, an issue with the cartridge may be preventing resin from dispensing:
Check that the cartridge vent cap is open.
Check the inside of the vent cap to ensure the vent is not blocked.
Consider loosening the vent cap.
Check the bite valve on the underside of the cartridge to make sure it opens when squeezed.
Cartridge Low
The printer checks the estimated amount of resin in the cartridge before starting each print. If the estimated resin supply isn’t enough to complete the part, the printer displays Cartridge Low.
Tap Ignore on the touchscreen to continue the print. However, if the printer runs out of resin in the middle of a print, it pauses until a new cartridge is inserted. Long print pauses can cause a horizontal line across printed parts. Consider swapping the low cartridge for a full cartridge before starting the print, or monitor the print closely and insert a new cartridge as soon as the current cartridge runs out of resin.
Resin Tank Overfilled
If the resin tank is overfilled, the printer will show this error. Use a syringe or small disposable cup to remove small amounts of resin, and pour it into a separate container. If the printer incorrectly warns of a resin tank overfill, check that the float can move freely and inspect the LevelSense board for damage.
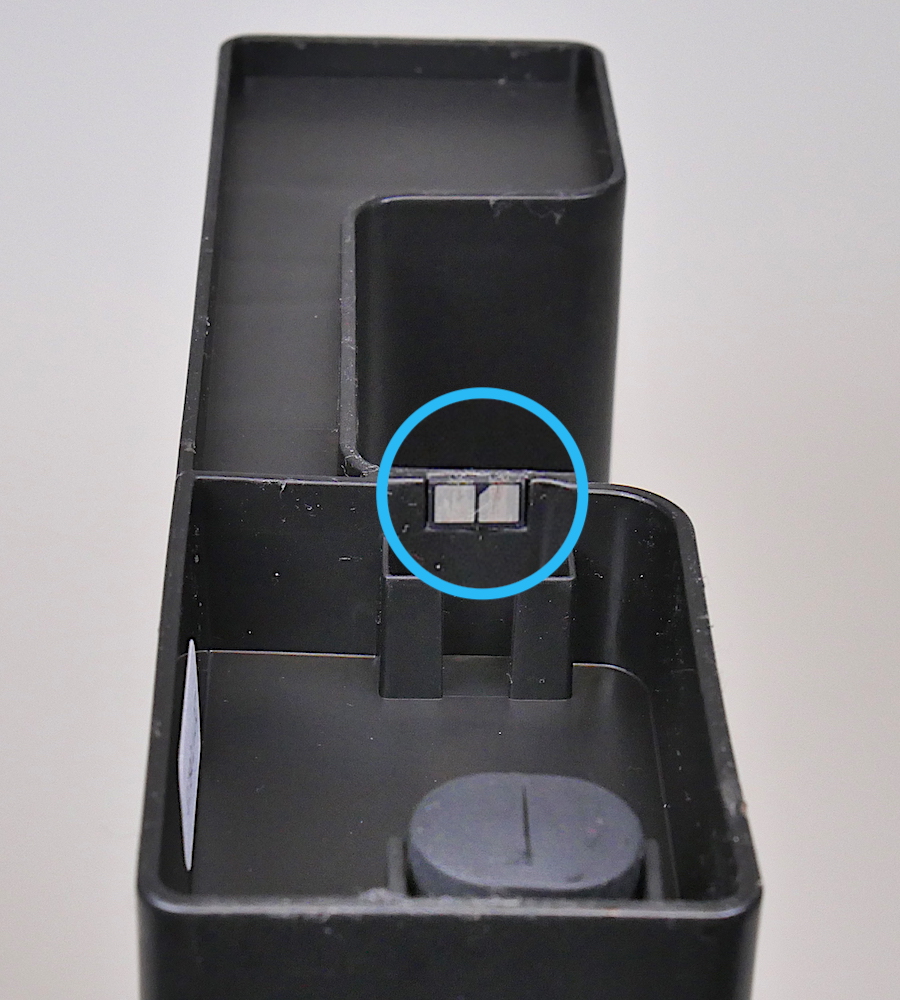
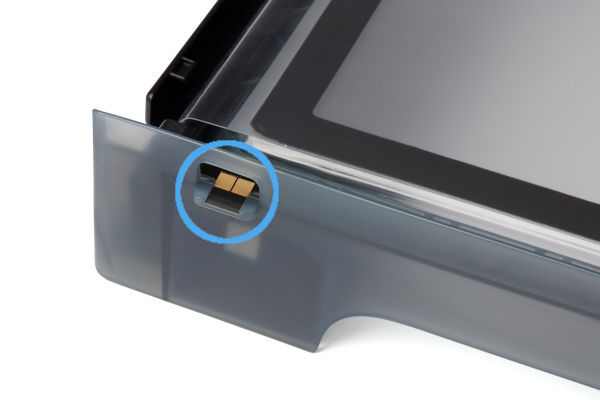
Missing Resin Tank and Missing Cartridge Errors
If the printer does not detect an inserted tank or cartridge, check the ID chip on the resin tank or cartridge to ensure the chip is present and clean. A dirty or missing chip can prevent the printer from detecting the tank or cartridge.
Resin cartridge chip location
Resin tank chip location
Fully remove and reinsert the resin tank or cartridge. The top of an inserted cartridge should be flush with the rear of the printer. A fully-inserted resin tank locks into the tank carrier rails and will be flush against the back of the printer.
Resin Tank and Cartridge Warning
The printer checks the resin type in the tank and cartridge to ensure they match the current print job. If they do not match the resin type identified in the print job, the printer displays Resin Tank and Cartridge Warning and prompts you to insert a tank and cartridge that match the print job settings.
Resin Tank Warning
If the resin cartridge is inserted first, the printer displays Resin Tank Warning when the type of resin in the tank does not match the cartridge. Remove the resin tank and replace it with one that matches the inserted resin cartridge. If the resin tank is unused and clean but has been programmed with the incorrect resin type, tap Ignore to reprogram the tank’s resin type.
Cartridge Warning
If the resin tank is inserted first, the printer displays Cartridge Warning when the type of resin in the cartridge does not match the tank. Remove the cartridge and replace it with the type of resin that matches the tank.
Motors Jammed
Sensors track the printer’s motor movements. If a motor does not return to its original position in the right amount of time, the printer displays Motors Jammed.
Anything in the path of a moving part may prevent the motor from moving properly. Open the cover to inspect the build platform and Light Processing Unit (LPU). Remove obstructions, then remove and reinsert the build platform and resin tank.
Heater Error
The printer stops heating if it cannot reach the target temperature of 30 °C (86 °F) after 60 minutes. In a cold operating environment, the printer may require more than one heating cycle to reach the desired temperature. Restart the print to begin heating again. For more information, refer to the support article Maintaining resin temperature.
Error 147
This error indicates that the printer was unable to move the tensioner system. Usually caused by a software issue, this can be resolved by restarting the printer and ensuring the firmware is up to date. If you see this error message repeatedly, contact Formlabs Support or your authorized reseller.
Cartridge Worn Out
Each cartridge contains and can reliably dispense one liter of resin. After the full liter dispenses, dispose of the cartridge and continue printing with a new cartridge. Restart the print once the depleted cartridge has been replaced.
Resin Level Sensor Error
The LevelSense board is located directly behind the resin tank. It senses the position of a metal float in the resin tank to determine the amount of resin in the resin tank. The printer may display Resin Level Sensor Error if there is an issue with the float or the LevelSense board.
If the printer displays Resin Level Sensor Error, follow each step to see if that step resolves the error:
Remove the resin tank from the printer (if one is inserted) and tap Next.
Close the printer cover and tap Calibrate.
Once the calibration process is complete, tap Done.
If the printer still displays the error, try a different resin tank. If the error does not occur with a different tank, the problem may be with the resin tank.
If the error happens with all resin tanks, contact Formlabs Support or your authorized reseller.
Mixer Check Failure
At the start of each print, the LPU housing pulls the tank mixer back and forth across the tank film several times. This motion mixes the resin in the tank while also checking for cured resin on the film and on the build platform. If the mixer encounters cured resin blocking its path, its magnets decouple from the magnets in the LPU housing and the printer pauses the print. This is the designed behavior of the mixer and is intended to protect the tank film and prevent further print failures. If the printer displays Mixer Check Failure, follow these steps:
Remove the build platform and inspect it for cured resin or other debris.
Unscrew and remove the vent cap at the top of the resin cartridge.
Carefully pour a small amount of resin from the resin cartridge into the resin tank, lightly coating the flexible film.
Replace the vent cap.
Insert the resin cartridge into the printer.
Restart the print.
NOTICE: Do not use the part removal tool, scraper, flush cutters, or any other metal tool to inspect the resin tank or remove cured resin from the tank. Such tools may damage the tank film, leading to failed prints and/or a resin spill.
Printer Tilted
Formlabs SLA printers operate best when perfectly level. The touchscreen prompts you to level the printer when necessary. Tap Settings > Printer Leveling on the touchscreen to view the current level status. Follow the touchscreen prompts and use the leveling tool to level the printer.
Reset While Printing
If power to the printer is interrupted during a print job, the printer does not resume the print job when it restarts. The touchscreen displays Reset While Printing. If the reset was unexpected, contact Formlabs Support or your authorized reseller.
Wi-Fi Errors
The printer displays specific error messages depending on the Wi-Fi access point’s response to the connection attempt. Refer to the support article Connecting to your printer to set up a connection via Wi-Fi, USB, or Ethernet. Always check with a network administrator to ensure that the wireless network is configured to allow the printer to connect. For a Windows operating system, follow Apple’s instructions to ensure that Bonjour is properly installed. This step is required to connect. PreForm must be connected to the same network as the printer for wireless uploading.
Invalid Network Key
The password was not entered correctly. Check the network password. Check with a network administrator to ensure that the wireless network is configured to allow the printer to connect.
Connection Failed
The printer failed to configure the wireless connection and could not connect to the network. Check with a network administrator to ensure that the wireless network is configured to allow the printer to connect.
Factory Reset Instructions for Form 3/3B
On some occasions, a factory reset may correct unusual printer behavior. Unusual behavior may include Unknown Error messages, incomplete firmware updates, an unresponsive touchscreen, or trouble connecting to PreForm. A factory reset erases custom settings, including prints saved in the Queue and network connections.
NOTICE: A factory reset erases all print job information, custom settings, and diagnostic logs. Upload diagnostic logs before performing a factory reset.
Unplug the printer.
Reconnect the printer power cable.
When the Formlabs logo appears, push and hold the reset button located underneath the USB port in the rear of the printer until Resetting to factory defaults appears on the touchscreen. You may need to use a paperclip or other small tool to push the reset button.
Release the button.
The touchscreen displays Factory reset complete before initializing the printer.
Factory reset button location
Factory Reset Instructions for Form 3L/3BL
On some occasions, a factory reset may correct unusual printer behavior. Unusual behavior may include Unknown Error messages, incomplete firmware updates, an unresponsive touchscreen, or trouble connecting to PreForm. A factory reset erases custom settings, including prints saved in the Queue and network connections.
NOTICE: A factory reset erases all print job information, custom settings, and diagnostic logs. Upload diagnostic logs before performing a factory reset.
Unplug the printer.
Reconnect the printer power cable.
When the Formlabs logo appears, push and hold the reset button located underneath the USB port in the rear of the printer until Resetting to factory defaults appears on the touchscreen. You may need to use a paperclip or other small tool to push the reset button.
Release the button.
The touchscreen displays Factory reset complete before initializing the printer.
Get ready to print with the Form 3L/Form 3BL. Learn best practices to set up and use the Form 3L/Form 3BL and its resin tank, build platform, and resin dispensing system.
Form 3L/3BL Components
1. Resin cartridge: Two containers hold the resin before dispensing into the resin tank. Shake the resin cartridges periodically to keep resin well mixed.
2. Cover: The printer lid, made of metal and a strong, orange-tinted material, blocks exposure to the lasers and protects the resin from curing due to ambient light.
3. Build platform: The aluminum base provides a surface for prints to attach to.
4. Resin tank: Resin is dispensed out of the resin cartridges into the resin tank. During a print, two lasers pass upwards through the flexible film and cure resin onto the build platform to form a printed part.
5. Mixer: Each resin tank includes a mixer that improves print consistency by clearing the build area and circulating the resin.
6. Touchscreen: The LCD capacitive touch user interface displays print information, settings, and error messages.
7. Leveling disc: Slide the leveling disc included around one of the leveling feet and rotate to raise or lower the printer.
8. Status light: Two interior lights (vertical strips along the left and right walls) and an illuminated logo (on the front panel) that pulse to indicate the printer is active, a print has completed, or the printer has encountered an error.
Turning On the Printer
To turn on and initiate the printer, follow these two steps.
Plug the included power cable into the power port on the back of the machine and connect the power cable to a power outlet.
The printer initiates automatically.
The first time the printer is connected to power, the touchscreen displays a series of onboarding steps. The onboarding steps include instructions for inserting consumables (resin tank, resin cartridges, and build platform) into the printer, additional details for which are given below. Follow these steps to prepare the printer for use.
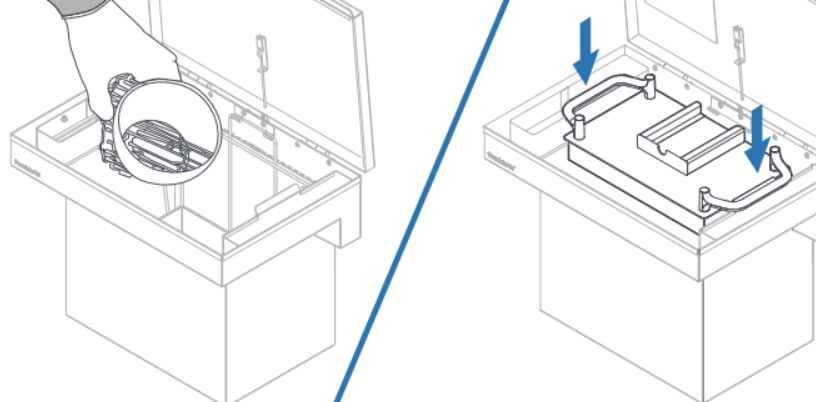
Inserting the Resin Tank
Resin is dispensed out of the resin cartridges into the resin tank. During a print, two lasers pass upwards through the flexible film of the resin tank and cure resin onto the build platform to form a printed part.
The resin tank is the primary container for holding resin after it is dispensed from the cartridges. Resin is cured onto the build platform when the laser passes through the tank’s bottom film.
Open the printer cover.
Open the lid of the tank case.
Remove packaging materials from the resin tank.
Lift the resin tank with one hand on each side.
Add block
With the tank spout facing right, rest the front edge of the resin tank on the rails in the printer.
Push the resin tank forward, pressing evenly on both sides, until the resin tank reaches the back of the machine. The resin tank magnetically clicks into place. You should not need to apply significant force. The printer will not properly detect the resin tank unless it is fully inserted.
If the printer is turned on, the touchscreen displays a message, plays a notification sound, and the status lights pulse to show that a resin tank has been detected.
Installing the Mixer
Each resin tank includes a mixer that improves print consistency by clearing the build area and circulating the resin. Scrapers on the top and bottom of the mixer clear the build platform and flexible film, respectively. To install the mixer:
Open the printer cover.
Orient the mixer with its arms facing upward and toward the right side of the resin tank.
Place the mixer flat in the resin tank.
Push the mixer to the right edge of the resin tank until the magnets engage.
Installing the Build Platform
The build platform is the surface onto which parts are printed. It is secured in place on the build platform carriage during a print with the platform lock.
Raise the platform lock.
Align the build platform with the build platform carriage.
Push the build platform onto the build platform carriage. A sensor detects the build platform, and the status lights pulse.
Lower the platform lock to secure the build platform.
Installing the Resin Cartridges
Resin cartridges hold liquid resin before it is dispensed into the resin tank. Given the Form 3L’s build volume and the size of the resin tank, it uses two resin cartridges at once.
Close the printer cover.
Shake the resin cartridges before each print to ensure the resin is mixed thoroughly. Shake each resin cartridge approximately every two weeks during storage to keep resin well mixed for the best print quality.
Remove the protective valve cover from the bottom of each resin cartridge. Formlabs recommends saving the valve covers to protect the bite valves when storing the resin cartridges.
NOTE: Do not remove the flexible, rubber bite valves at the bottom of the resin cartridges. These bite valves control the release of the resin. Removing the bite valves allows resin to continuously flow and causes extreme damage to the printer. This damage is not covered by the warranty.
Align the resin cartridge with one of the two cartridge slots on the right side of the printer.
Place the resin cartridge into the slot. The resin cartridge fits into the slot in one orientation.
If the printer is turned on, the touchscreen displays a message, plays a notification sound, and the status lights pulse to show the resin cartridge has been detected.
Press the vent cap open, so that the resin tank fills correctly.
Place a second resin cartridge, with the same resin type and version, into the other slot.
Press the vent cap open on the second cartridge.
Next Steps
We have a wide variety of support articles available, and here you can see some commonly used resources. If this is your first time operating your printer we would recommend preform download and overview for your next steps.
Dry sanding, wet sanding, priming, painting parts (optional)
Removing Parts from the Printer
Always remove the build platform first, then remove the resin tank, as this will help to avoid dripping resin onto the glass optical window or into the printer cavity. Close the cover immediately after removing the platform to prevent ambient light from curing the liquid resin in the resin tank and potential contaminants like dust from entering the print area.
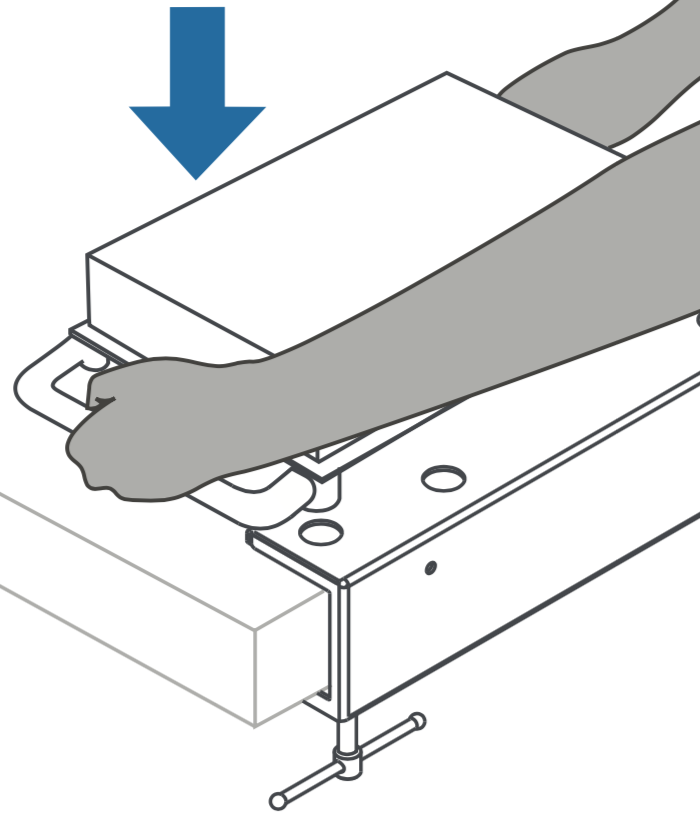
Secure the Build Platform on the Jig
Place the build platform on the jig included in the printer’s finish kit.
01
Form 2 and Form 3/3B
02
Form 3L and Form 3BL
Remove Parts from the Build Platform
To release parts from the build platform, slide a removal tool under the angled edge of the base. Depending on resin type and the geometry of each part, some parts may be easier to remove from the build platform than others.
Tools used to remove parts will scratch the metal surface of the build platform. Scratches are normal and improve part adherence during the initial layers of printing.
01
Form 2 and Form 3/3B
02
Form 3L and Form 3BL
Washing, Soaking, and Moving Parts in Solvent
Isopropyl alcohol (IPA) or tripropylene glycol monomethyl ether (TPM) dissolve liquid resin, making them effective for washing parts printed on Formlabs SLA printers. Two factors—simultaneously soaking and moving parts in solvent—work together to remove the thin layer of liquid resin from the surface of printed parts.
Whether using the Form Wash, Form Wash L, or another washing method, such as the Finish Kit, always consult the support article Form Wash time settings as the primary source of information for up-to-date wash times.
Move Parts In Solvent
Directions for Form 2 and Form 3/3B
Open the first rinse bucket and place the parts in the solvent bath. Use the rinse basket to shake the parts for 30 seconds. This removes liquid resin from the exterior surfaces.
Directions for the Form 3L and Form 3BL
Soak Parts in Solvent
Close the rinse bucket lid and let the parts soak for approximately half the total recommended time.
An easy printable guide for recommended times can be found here.
Repeat with a Second Rinse
Directions for the Form 2 and Form 3/3B
Move the parts to the second rinse bucket, then repeat the movement step, and soak the parts for the remaining time.
Directions for the Form 3L and Form 3BL
Move the parts to the second rinse bucket, then repeat the movement step, and soak the parts for the remaining time.
Drying Printed Pieces
Always let prints fully dry (whether they have been washed in IPA, TPM, or water) before post-curing or post-processing. Forced air, such as a fan or clean compressed air may dry parts more quickly.
For volatile solvents such as IPA, allow parts to dry for at least 30 minutes after washing to allow the solvent to fully evaporate from part surfaces. Ensure appropriate ventilation while the solvent evaporates.
For solvents that do not readily evaporate, such as TPM, let parts drip dry thoroughly and then rinse in water or IPA until all remaining TPM has dissolved.
Cleaning the Build Platform
Always scrape cured resin off the build platform before reusing it. If the next print uses the same type of resin, there is no need to remove liquid resin. Replace the build platform in the printer and start the next print.
If you are switching resin types, or if you do not plan to reuse the build platform right away, clean the build platform with IPA and paper towels to thoroughly remove liquid resin from the build surface and edges. Liquid resin cures in ambient light, and resin left on the surface of a build platform renders it unusable.
Post-Curing Pieces
Post-curing is optional for standard resins. Other resin types require post-curing to achieve their optical-mechanical properties.
Whether using the Form Cure, Form Cure L, or another post-curing solution, always consult the support article Form Cure time and temperature settings as the primary source of information for up-to-date post-cure settings.
Removing Supports
Formlabs recommends removing supports after post-curing, since parts may warp under exposure to light and heat without structural support.
Use the flush cutters included in the finish kit to carefully cut the supports attached to the parts. You may also use a scalpel or hobby knife to remove supports.
For parts with complex or delicate geometries, refer to the support article on advanced support removal.
Preform is the software provided by Formlabs that will convert your model file into machine directions to create your print. These machine instructions are produced automatically, based upon user configurable options. This page will go over the basics of setting up your machine settings, changing basic variables for print quality, and ensure successful prints using Formlabs products. More detailed guides and forms regarding post processes will be linked out to our OEM’s continually updated recommendations.
Download and Install
To install PreForm on your computer to use with a Fuse 1 printer:
Click the Download button for your computer’s operating system. An EXE or DMG file downloads.
Open your Downloads folder.
Double-click the file named Preform_setup to begin installing PreForm. A setup window opens.
Follow the prompts to finish installing.
Selecting a Printer in PreForm
When opening PreForm for the first time, a Virtual Printer is selected by default. Selecting a printer in PreForm allows you to send a new print job to the printer or to view the status of a current print job. To select a printer in PreForm:
Click the < button. The Job Info dialog box opens.
Click the printer name. The Job Setup window opens.
Click the Select Printer arrow. The Printer List window opens.
Click the name of a Printer you wish to select. The Printer Details window opens.
Click Select. The Job Setup window opens.
Click Apply. The selected Printer appears in the Job Info dialog box.
Update Firmware
Download the latest firmware version for your Formlabs SLA printer with PreForm, then upload and install the firmware file on the printer. Review the firmware release notes to learn more about the improvements that come with each version’s release.
Open PreForm.
Connect the printer to the computer via USB or wire the printer to an Ethernet network.
Click the < button. The Job Info dialog box opens.
Click the printer name. The Job Setup window opens.
Click the Select Printer arrow. The Printer List window opens.
Click on the name of a printer you wish to select. The Printer Details window opens.
Click Update in the upper-right corner of the Printer Details window. The Firmware Update window opens.
Follow the on-screen instructions to download the latest firmware and then upload the file to the printer. To upload firmware, the printer must be connected to the computer via USB or the printer must be wired to an Ethernet network.
The printer may automatically recognize you have sent a firmware update. Tap Continue on the printer’s touchscreen to finish the installation.
If you are not prompted to Continue, you must continue the firmware update manually:
On the touch screen, tap Settings > System > Firmware Update.
After the firmware update installs, confirm the system restart on the touchscreen or wait 30 seconds for an automatic restart.
Matching Materials in PreForm to the Inserted Resin Tank and Cartridge
Send a print job to the printer and confirm the print job on your printer’s touchscreen. The printer indicates whether the resin tank and cartridge currently inserted match the print job settings, and prompts you to change materials, if necessary. To change the materials selected in PreForm to the resin tank and cartridge currently inserted in your printer:
Click the < button. The Job Info dialog box opens.
Click the printer name. The Job Setup window opens.
Click the Select Printer arrow. The Printer List window opens.
Click the name of a Printer you wish to select. The Printer Details window opens.
Click Select. The Job Setup window opens.
Click the Resin field. A dropdown appears.
Select Current Printer Settings from the dropdown. The material matches what is currently inserted in the printer.
Loading a Model in PreForm
To open a single OBJ or STL file or multiple files to print on the same build platform:
Open PreForm.
In the menu bar, click File > Open. The Open File window appears.
Select at least one file.
To select multiple models, press and hold the command key on macOS or the CTRL key on Windows.
Click Open. The selected models appear in PreForm.
Moving and Rotating a Model in PreForm
Choosing which face of a model should point toward the build platform, and which face should point away, is a decision that affects more than just printability. The face that acts as a base is usually impacted the most by support marks that result in a rough surface finish. If preserving the fine details on your model is important, try orienting the model with that face away from the build platform.
Rotating a Model
Angle your model along the X, Y, and Z axes to orient it around the build platform.
Select the model. Manipulators are overlaid on the model.
Click Orientation. A dialogue box opens.
To rotate:
Click-and-drag along the sphere manipulator to spin the model freely.
Click-and-drag on a ring to move the model along that axis.
Enter a specific angle into an axis field.
Click on an axis arrow.
Hover the pointer over an axis field and use the scroll wheel
Moving a model
Move a model to a different location on the build platform to create space for other parts or to prolong the life of a tank.
Select the model. Manipulators are overlaid on the model.
To move:
Click-and-drag the Move manipulator to a new location on the build platform.
Click-and-drag the selected model to a new location on the build platform.
Positioning by Base
Layer thickness affects both the speed and quality of a print. Thicker layers print faster but sacrifices detail. Thinner layers print more slowly but are able to capture finer details. Most materials have a variety of layer thickness settings to choose from, so there’s always an option to suit your needs.
Select the model. Manipulators are overlaid on the model.
Click Orientation. A dialogue box opens.
Click Select Base…. A window opens and the pointer appears as an orange arrow.
Click a face of the model to point it toward the build platform.
Click Done. The window closes.
Adjusting Layer Thickness in PreForm
Selecting Resin and Layer Thickness
Preserve the fine details of your model by facing the smaller features away from the build platform. To choose which side faces the build platform:
Layer Thickness is measured in fractions of a millimeter, often given in microns. 1 micron (µm) is equal to 0.001 of a millimeter (mm). To provide a sense of scale, 100 microns is the same thickness as a sheet of paper or a human hair. To set the Layer Thickness:
Click the < button. The Job Info dialog box opens.
Click the printer name. The Job Setup window opens.
Click the Resin field to select a material from the dropdown.
Click the Version field to select a version from the dropdown.
Drag the Layer Thickness slider to the desired thickness.
Click Apply. The selected material and layer thickness settings are applied.
NOTE: Support will be generated differently depending upon material and layer thickness.
Effect of Layer Thickness On Printed Parts
Effect of layer thickness on parts with supports. Effect of layer thickness on parts without supports.
Selecting Adaptive Layer Thickness
Adaptive layer thickness is a setting that balances speed and quality to give you the best of both worlds. When PreForm detects curves, slants, and other features that would be negatively impacted by thicker layers, it processes these features into thinner slices. When PreForm detects walls, columns, and other verticals that can be printed in a single, large piece it automatically increases the layer thickness. PreForm transitions smoothly from one layer setting to another so there are no sudden jumps in thickness.
Layer Thickness is set to Fixed by default. Selecting the Adaptive setting automatically changes the layer thickness throughout a print job based on the geometry between layers. To switch to Adaptive layer thickness:
Click the < button. The Job Info dialog box opens.
Click the printer name. The Job Setup window opens.
Click the Resin field to select a material from the dropdown.
Click the Version field to select a version from the dropdown. A Fixed and Adaptive toggle appears.
Click Adaptive. The Adaptive Layer Thickness notification appears.
Click Apply. The selected material and layer thickness settings are applied.
NOTE: Support will be generated differently depending upon material and layer thickness.
One-Click Print Options
When orienting and supporting a model, keep in mind that a model has several correct orientations. Clicking One-Click Print shifts models between these different orientations and supports them accordingly. To orient and support a model with One-Click Print in PreForm:
Click the < button. The Job Info dialog box opens.
Click the name of a Printer. The Job Setup window opens.
Click the Resin field to select a material from the dropdown.
Click the Version field to select a version from the dropdown.
Drag the Layer Thickness slider to the desired thickness.
Click Apply. The selected material and layer thickness settings are applied.
Click the One-Click Print icon. The One-Click Print dialog box opens.
Click Set up your print. The model is oriented and supported, then the Print window opens.
Click the Select Printer arrow. The Printer List window opens.
Click the name of a Printer. The Printer Details window opens.
Click Select. The Print window opens.
Click the Job Name field. Enter a new name or view the existing name.
Click Upload Job. The model is sent to the printer.
Generating Support Structures
Supports are the cornerstone of a successful SLA print—they hold the model in place throughout the entire printing process. Support structures reinforce overhangs and other delicate features. Adding more supports increases the likelihood of print success, but also increases the amount of post-processing work. Support structures can be generated automatically or adjusted manually per model.