Categories
3D Printing

Loading Filament On The Ultimaker 2+ Connect

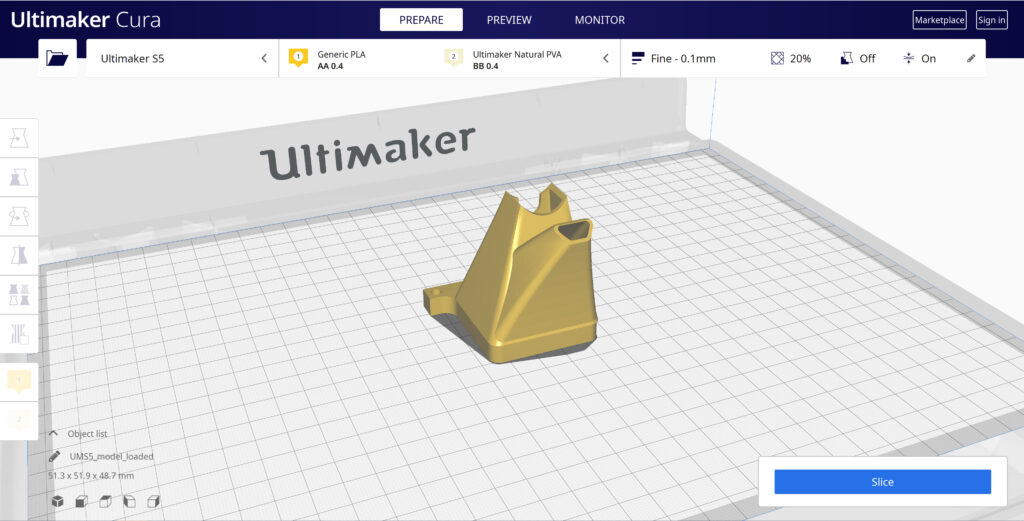
Before you can start printing on the Ultimaker S3/S5, you need to load materials into the printer. For the first use, it is recommended to use the spools of  Tough PLA and PVA that come with the Ultimaker S3/S5.


Getting Started

Before you can start printing on the Ultimaker 2+ Connect, you need to load material into the printer. For the first use, it is recommended to use the spools of  Tough PLA that comes with the Ultimaker 2+ Connect.


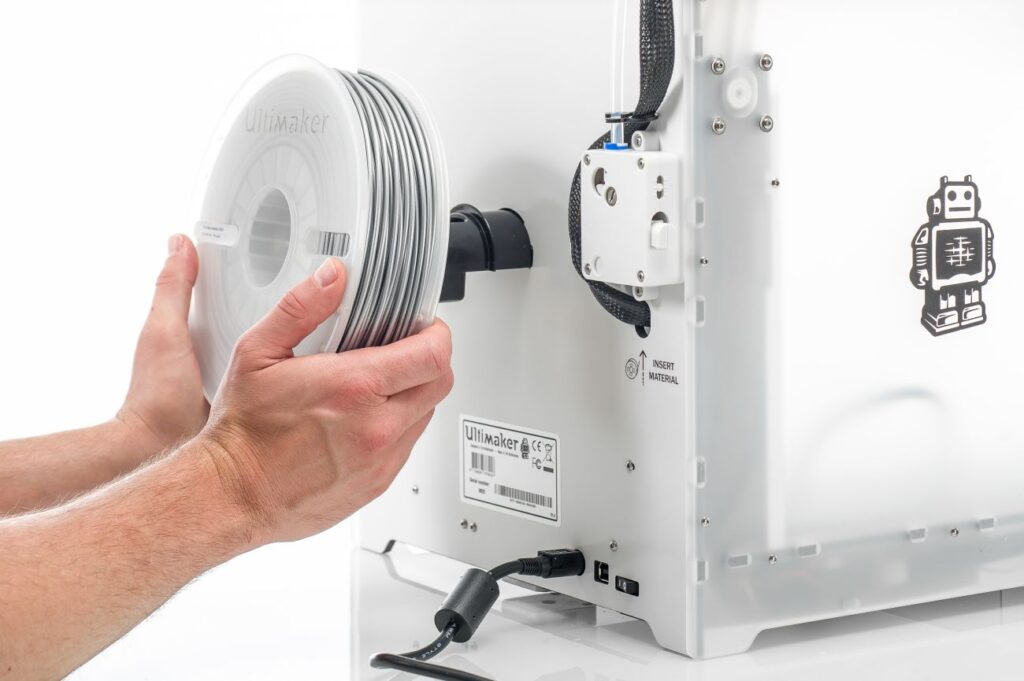
Mount The Material Spool

01

Place the spool with the material on the spool holder. Make sure to put it with the material in a counter-clockwise direction, so that the material can enter the feeder from the bottom.

02

Wait for the Ultimaker 2+ to heat up the nozzle. This will ensure the material can flow through the nozzle while the printer feeds filament.


Insert Material Into Feeder

01

Insert the material into the feeder and gently push it until the material is grabbed by the feeder and is visible in the Bowden tube. Select confirm to continue.

02

Confirm when the new material extrudes from the nozzle.

Categories
3D Printing

Ultimaker 2+ Connect Unboxing and Setup

The Ultimaker 2+ Connect comes in reusable, durable packaging, specially designed to protect your 3D printer. Ensure you save your packaging, it will be required to send the machine in should it require warranty service and will ensure the safety of your machine when changing locations.


Follow the steps below to unpack your Ultimaker 2+ Connect:

01

Place the box on the ground.

02

Remove the plastic locking clips from the lower section of the box.

03

Holding the handles, lift the upper section of the box, and place it aside.

04

Take the quick start guide, safety and warranty information booklet, accessory box, and a spool of filament off the upper cardboard piece.

05

Remove the upper cardboard section and four foam pieces.

06

Carefully lift the Ultimaker 2+ Connect out of the bottom cardboard section and foam pieces.

07

Place the printer on a flat surface.


What Is Included With Your Printer

The Ultimaker 2+ Connect is supplied with several hardware accessories. Check if all these items are included before continuing:

Accessories
  • Glass plate
  • Spool holder
  • Power adapter and cable
  • Ethernet cable
  • USB stick
  • Calibration card
  • 0.4 mm nozzle
Consumables
  • PLA Silver Metallic 750 g
  • Glue stick
  • Oil
  • Grease
Tools
  • Hex screwdriver 2 mm
  • Hex key 2.5 mm
  • Nozzle wrench
  • Print head calibration aid
Documents
  • Quick start guide
  • Safety and warranty information

Get to Know Your Printer

Familiarize yourself with the different components of the Ultimaker 2+ Connect. Throughout our documentation, these terms will be used frequently.


Hardware Installation and Setup

01

Insert the spool holder into the back panel and push until it snaps into place.

Install spool holder
02

Open the front build plate clamps to insert the glass plate.

Open front build plate clamps
03

Slide the glass plate into the rear build plate clamps, then close the front clamps.

Install glass build plate
04

Connect the power cable to the printer with the flat side facing down and the other end to a power outlet.

Plug in printer

Categories
3D Printing

Ultimaker Support Resources

Categories
3D Printing

Ultimaker 2+ Connect Air Manager Installation

The Ultimaker 2+ Connect Air Manager gives you more confidence and setup flexibility. Designed to increase user safety, it removes up to 95% of ultrafine particles and shields users from hot and moving components. This is an excellent addition to any office or education-focused environment.


The Air Manager is delivered in separate components, which can be installed in a few easy steps.

01

Align the filter housing with the back of the Ultimaker 2+ Connect.

02

Guide the Bowden tube and print head cable into the slot.

03

Push down on the filter housing until it clicks firmly into place.

04

Gently push the filter completely into the filter housing, with the tab facing down.

05

Place the cover over the filter housing and align it with the top panel; ensure there are no gaps between the cover and the printer.

06

Connect the Air Manager cable to the port at the back of the Air Manager and ensure it is secure with the clip.

07

Guide the Air Manager cable around the left side of the spool holder.

08

Plug the cable into the OUT port at the back of the Ultimaker 2+ Connect.

09

Take the front enclosure and place the hinge profile on the front panel as shown.

10

Push the handle against the panel; the magnet will hold the front enclosure in place when closed.

The front enclosure must be installed when the Ultimaker 2+ Connect is printing. To remove the print, or for certain maintenance procedures, the front enclosure must be removed. This can be conveniently placed on the top of the printer, resting against the Air Manager cover.

Familiarize yourself with the different components of the Ultimaker 2+ Connect Air Manager. Throughout our documentation, these terms will be used frequently.

Categories
3D Printing

Recommended Maintenance For Ultimaker 2+ Connect

Maintenance Schedule

To keep your Ultimaker 2+ Connect in optimal condition, we recommend the following maintenance schedule, based on 1,500 printing hours per year. If you are printing more than 1,500 hours per year be sure to adjust your maintenance schedule accordingly.

Click the link for each support topic for detailed instructions in how to accomplish your task.


Categories
3D Printing

Ultimaker Error Codes and Solutions

Your Ultimaker printer has multiple sensors and safety features built in to help ensure your printer is operating correctly and safely. This page will show the common error codes along with links to guides on how to resolve the situation.

Ultimaker S Series Error Codes

Categories
3D Printing

Slicing A Model File With Cura

General Overview

Cura and other slicing programs transform a CAD model (STL, OBJ, 3MF) into a set of machine instructions that tell your printer how to create your model. There are hundreds of settings that you can control within Cura. Everything from layer height, speed, fan settings, acceleration, jerk etc. Cura comes with pre-made profiles for ease of use and to ensure quality, and it is highly recommended starting with these for all of your prints.

In this support article, we will cover everything you need to know in order to get a print up and running using Ultimakers Cura Software.


Download and Install

Cura is available for Windows, Mac OSX, and Linux operating systems. Ultimaker updates Cura on a regular basis, so be sure to check back for the latest free updates. You can find the most recent version available for download here. After installing the program appropriate for your Operating System, launch the program to prepare your file.


Machine Addition and Selection

After launching the program, you will be prompted to select a machine. In this walkthrough, we will be using the Ultimaker S5. If you are using another Ultimaker product, please ensure to select that machine that corresponds with your product.

Should you ever need to add a new machine for slicing, you can gain access to this same menu by going to the top menu of Cura and going to settings > printer > add printer.


Print cores are compatible with specific material combinations, and it is important to have these properly selected each time you slice a model file.

At the top of the main Cura prepare screen, you will see which current materials and print cores you have selected. Clicking the drop-down arrow on the right hand side will allow you to change the cores as desired.

NOTE: If you have an incompatible material with your print core, a red box will appear and prevent you from slicing your file.


Loading Model and Print Orientation

You can load your print model in one of three ways:

  • In the top left corner, go to File > Open File(s) > Select Model File.
  • In the top left, you will see an “Open File” icon.
  • You can drag and drop your model file onto the build platform representation.

After your model has been loaded onto the platform, you will want to consider how to position it for ideal printing. In general, you will want a flat surface on the build plate to help with adhesion whenever possible.


Quick Profile Options

When first starting with your 3D printing journey, you will want to remain within the recommended settings as provided within Cura. These settings will help ensure reliability and quality for the vast majority of models you will print.

  • The Profiles section will allow you to set layer height based upon different factors such as visual look, engineering quality, or draft settings.
  • The Infill (%) section will allow you to determine how solid your model file is. 10-20% is perfectly fine for most non-load-bearing components.
  • Gradual Infill option will print your object with less infill lower down in the model and increase as the object prints to help support the upper skin of the print.
  • Support generates support structures to help your object print overhangs and steep angles. A general rule of thumb is your printer will not require supports if your model is between 45 and 90 degrees of the build plate.
  • Adhesion is turned on by default for most profiles and helps secure your object to the build plate. It does this by increasing your objects footprint, by printing lines around the base of your object.

Generate and Print Your File

After you have your model positioned and changed any settings you desire for your application, it is time to generate the print file and get it to your printer. The process of generating your machine directions is called “slicing” as it cuts your model into slices to generate the code.

Slicing Your Model File

  • Automatic Slicing can be enabled through Preferences > Configure Cura > Enable Automatic Slicing. When enabled, Cura will automatically begin to slice your model after each setting change. This can be an intensive load on your computer and is recommended to disable this for older computers.
  • When “Enable Automatic Slicing” is disabled, Cura will wait to generate your file until you select “Slice” from the lower right-hand corner.

Printing Your File

Ultimaker provides a direct printing option via USB or allows you to send your print file over the network.

  • Printing via USB will require you to save your print file to the piece of hardware, and manually insert it into your printer. Once inserted, you will be able to select and start your print file from the user interface on your printer.
  • Printing over network requires you to sign into your Cura connect account, and you can then send the print file directly to your machine. This can then be started through the user interface on the panel or through Cura connect interface within Cura.
Categories
3D Printing

Removing Prints From Ultimaker

Print Removal Techniques

After your print has completed, it will need to removed from the glass build plate. There are a few separate techniques to accomplish this, and each can have advantages depending on the specific part and whether any additional adhesives were used.


Wait For the Glass Plate to Cool Down

If you printed directly on to the glass plate without using an adhesive, and if the build plate was not leveled too tightly, the print may easily be removed once it is cool. Simply allow the build plate and the print to cool down after printing. The material will contract as it cools and you can easily remove the print from the build plate.


Use a Spatula or Scraper

If your print doesn’t remove from the build plate after cooling, you can use a spatula to remove the print. Place the spatula under the print and apply a small amount of force to remove the print.

NOTE: Take the glass plate out of the printer to avoid damaging the build plate clamps.


Use Water to Remove the Print

If neither of these methods work, remove the print using water. Remove the glass plate and print from the Ultimaker. Be careful not to burn your fingers if the glass plate is still warm. Run cool tap water on the backside of the plate to cool it quicker – the print material will contract more than during a normal cool down. Once the plate has cooled, the print can be popped off.

If glue or Magigoo was used on the glass plate, run lukewarm water over the print side of the plate to dissolve the glue. Once the glue has dissolved, it should be easier to remove the print. If PVA was used, place the glass plate and print in water to dissolve the PVA – this makes print removal easier.