Categories
3D Printing Aerospace Education Engineering Healthcare Manufacturing

Tullomer Filament: Breakthrough Findings on Low-Outgassing for Ultra-High Vacuum Applications

Tullomer: The Ideal Low-Outgassing Filament for UHV Applications

With its remarkably low outgassing properties, Tullomer outperforms standard materials like PEEK, making it ideal for UHV applications. Extensive testing, including residual gas analysis, has proven its reliability in maintaining pristine vacuum conditions, making it a top choice for industries like aerospace and semiconductor manufacturing.

When designing components for ultra-high vacuum (UHV) applications, the choice of materials is crucial. Metals and ceramics have traditionally been favored due to their low outgassing properties, but recent advances in 3D printing are bringing plastics into the conversation. Evaluating these 3D-printed materials, particularly in terms of outgassing and residual gas analysis (RGA), is essential to ensuring they can maintain the integrity of a UHV environment.

Outgassing Challenges in UHV Applications

Outgassing refers to releasing trapped gasses from a material when exposed to vacuum conditions. 3D-printed plastics often present challenges due to the nature of polymer absorption and their manufacturing process, which can leave microscopic voids and unreacted compounds. For 3D-printed plastics to be viable for UHV applications, their outgassing properties must be minimized. Common strategies for reducing outgassing include baking components in a vacuum oven and applying specialized surface coatings.

Residual Gas Analysis and Testing Results

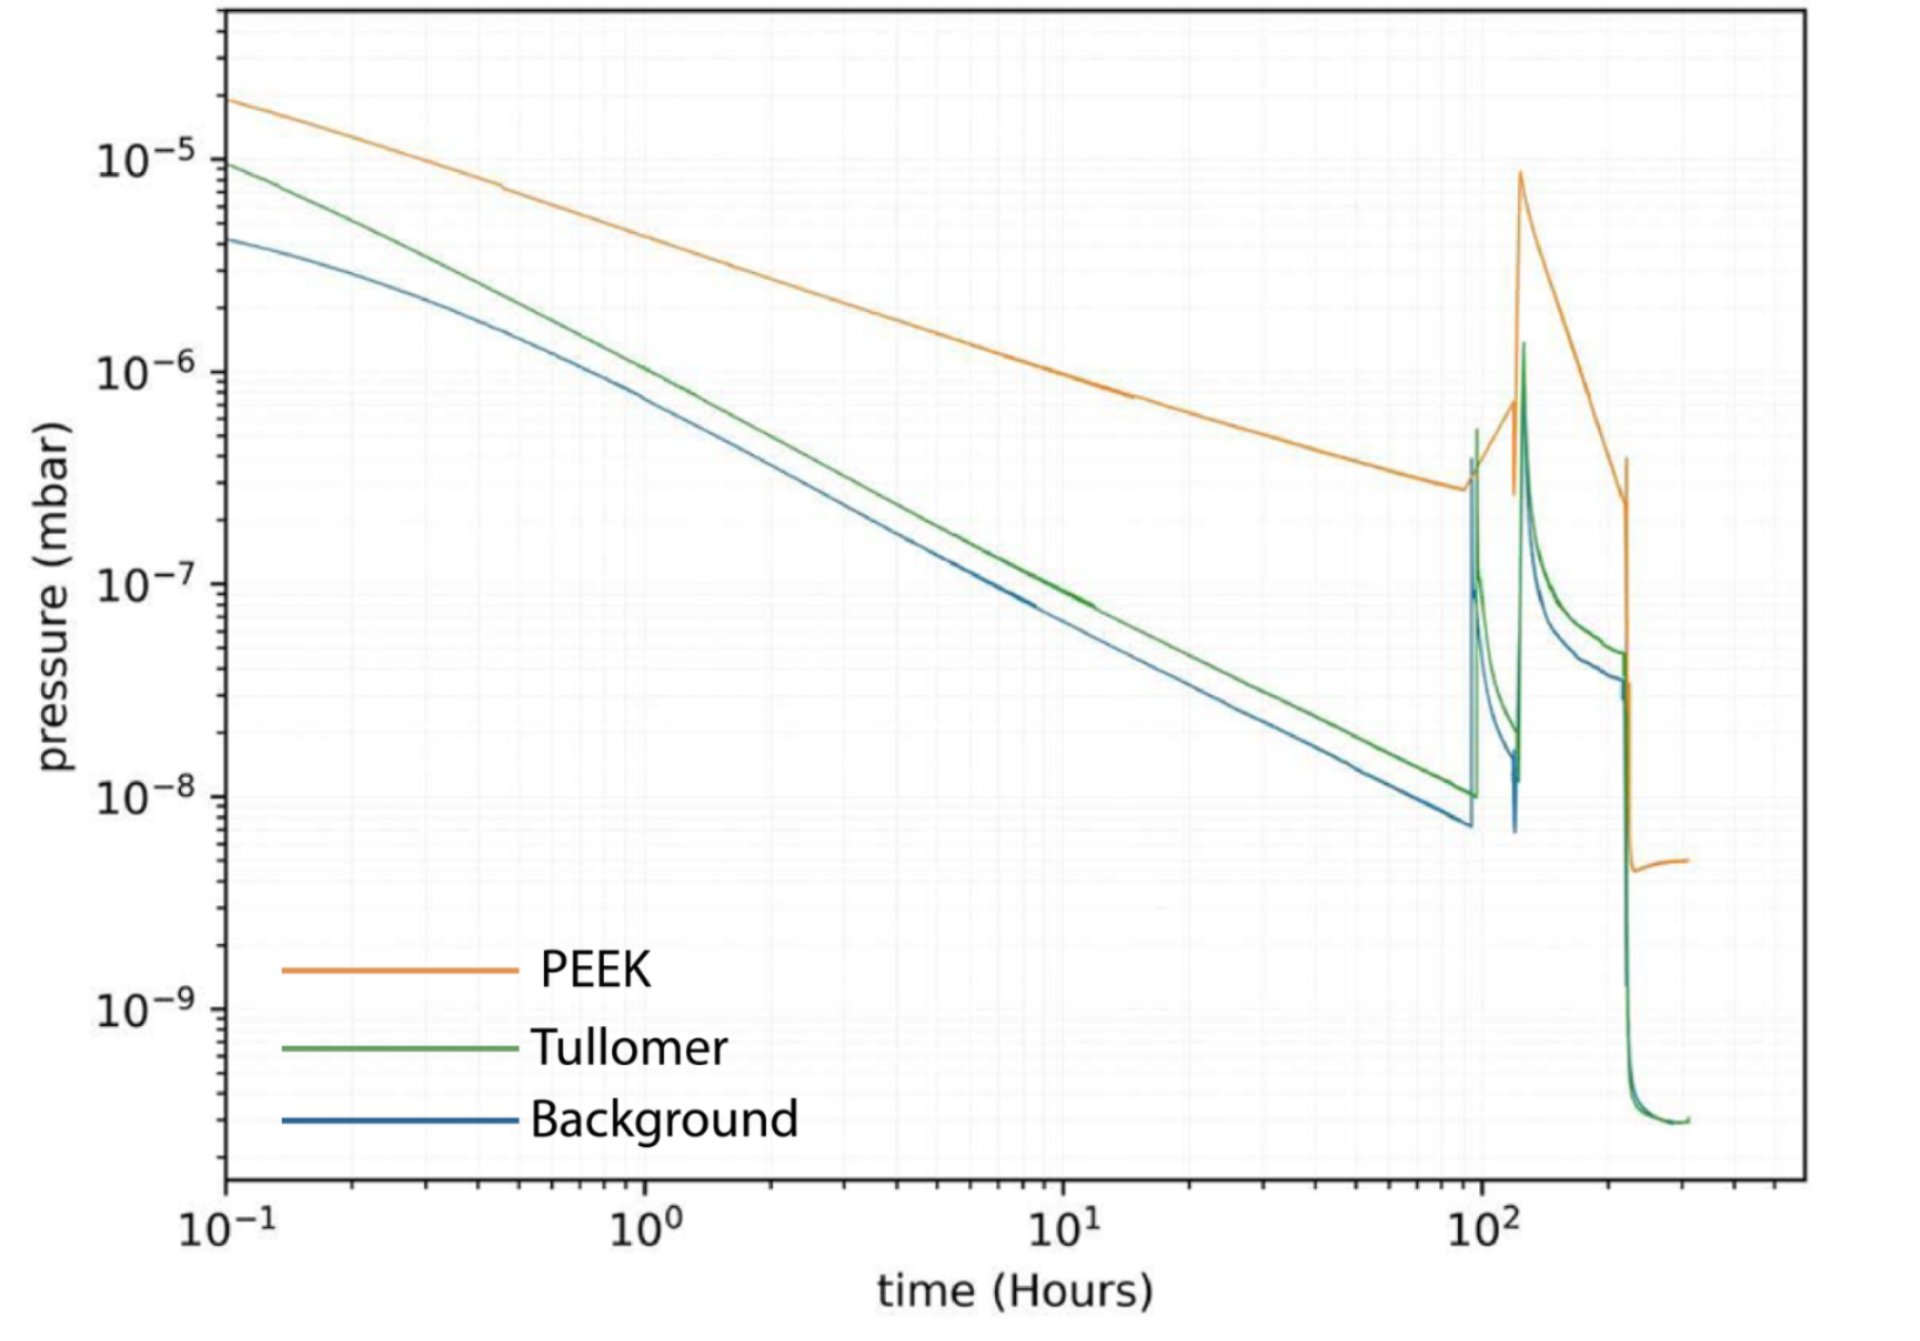
Residual Gas Analysis is a critical process used to evaluate the suitability of materials for UHV applications. By measuring the gases released from a material in a vacuum, RGA allows engineers to detect contaminants and the material’s overall outgassing characteristics.  In tests, Tullomer filament has shown a significantly lower emission of residual gases, making it a top choice for environments where even trace contaminants can cause issues.

Tullomer’s Superior Outgassing Performance

Tullomer filament has been scientifically proven to significantly outperform other materials in minimizing outgassing. In a recent study conducted by Lund University, Tullomer demonstrated an outgassing rate lower than industry-standard PEEK after a standard bakeout process. The results were so impressive that Tullomer reached the system detection limit post-bakeout, making it an ideal choice for engineers and researchers in UHV applications. These groundbreaking findings were presented at the SRI conference in Hamburg, where experts praised Tullomer for its unmatched outgassing performance in vacuum environments. As a result, Tullomer is now considered the top material for applications where maintaining vacuum conditions is critical.

Applications in Aerospace and Semiconductor Manufacturing

The unique formulation of Tullomer filament offers more than just low outgassing. It also provides exceptional strength and thermal stability, making it ideal for high-performance applications in both high-vacuum (HV) and UHV systems. Its low desorption rates ensure that vacuum conditions remain pristine, minimizing contamination risks while ensuring reliable operation over extended periods. Extensively tested and validated by leading experts in vacuum technology, Tullomer is engineered for precision. Whether you’re developing complex components for UHV research or deploying systems in critical environments like aerospace or semiconductor manufacturing, this filament offers unmatched performance, with proven results that set it apart from competitors like PEEK.

Why Tullomer is the Future of UHV-Compatible Filaments?

With the development of advanced filaments like Tullomer, 3D-printed plastics are set to become a reliable choice for UHV applications. While traditional polymers like PEEK and ULTEM have demonstrated solid performance, Tullomer’s revolutionary low-outgassing properties place it ahead of the curve. Its strength, thermal stability, and precision make it an indispensable material for engineers and researchers working in ultra-high vacuum environments. By minimizing outgassing and ensuring high system reliability, Tullomer elevates the standard for vacuum-compatible materials. Whether you’re prototyping or producing critical components, switching to Tullomer offers a new level of performance backed by scientific validation and industry trust.

Tullomer Out Performs All Tested Samples

Tullomer performed significantly better both before and after the bakeout, even reaching the detection limit of our setup for the sample size after the bakeout.

Tullomer vs PEEK

Tullomer filament residual gas analysis results

Tullomer vs all samples

Tullomer filament residual gas analysis results

Download The Full Case Study Results

Lund University’s Study on Outgassing Performance

Evaluation of 3D-Printed Plastics for Ultra-High Vacuum applications: Outgassing, and Residual Gas Analysis

Marketing by
Tullomer Filament

Tullomer: Minimize Outgassing, Maximize Performance

Categories
Education Engineering

Incorporating 3D Printing into
Real- World Biomedical Engineering

Whether you’re a 3D printing aficionado or just getting started with this in the classroom, printing trinkets gets old quickly. When searching for your next project, why not take on something that flexes your creativity and benefits others?


3D Printing in the Real World

3D printing isn’t just something to create a spinning table top for a school project! Practitioners of Biomedical Engineering use this technology regularly. In fact, every time a prosthetic arm is prepared for a patient, customized work must be done to create the right fit. 

When a patient receives a prosthetic hand or limb it is usually ordered “off the shelf”. The new prosthetic must be fitted to ensure compatibility with the size and shape of the person’s arm, write, or remaining limb. Just like fingerprints, each person is slightly different in the shape and size of their amputation site. Additionally, some amputees have their full arm remaining while others have also lost their full forearm. 3D printing techniques allow prosthetists to create customized fits for every patient based on their needs.


The NeuroMaker Connection

NeuroMaker’s materials and culminating experience, the NeuroMaker Challenge, provide students the opportunity to apply their knowledge of prosthetic and assistive devices to solving a real world problem. Students are encouraged to implement new technologies, including additive manufacturing.

Educational Use Case: King Kekaulike High School

Team Digit Prosthetic Band from King Kekaulike High School in Hawaii 3D printed out a specialized Biomedical attachment to a prosthetic finger. These specialized parts allow a person missing a finger to add one artificial finger from an artificial hand onto their wrist for better quality of life.

Educational Use Case: Central High School

Team Commodores of Perry Central High School in Indiana 3D printed out a specialized digit for their prosthetic hand which allows the placement of a piezo sensor. This sensor allows an amputee to detect how much pressure is being applied to an artificial finger. This group of students discovered applications for an amputee holding a baby and ensuring that not too much pressure is applied.


3D Printing Pieces to Investigate for Customized Prosthetics

Depending on how much adventure you’d like to take on, there are multiple ways to design custom pieces to real world prosthetic arm projects. Here are some quick ideas!

Custom Box to Hold Control Components

Learn how to create and print out the case which will hold the “brains” of your prosthetic by watching below.

In this video, step by step instructions are provided to build the control box attachment for the NeuroMaker Hand. Each action of the drafting process is here to follow along!

Once this item is drafted, this attachment will be placed on top of the Arm component of the NeuroMaker prosthetic. This will house all the electrical items needed to control your real prosthetic!

Arm Attachment

Learn how to create and print out a sample housing for your prosthetic to attach to a limb here by watching below.

In this video, step by step instructions are provided to build the grip attachment for the NeuroMaker Hand. Each action of the drafting process is here to follow along!

Once this item is drafted and printed, this attachment will be grasped by the wearer and will house the other pieces of the NeuroMaker prosthetic. This will be the main housing and grip attachment for your prosthetic arm!

Finger Pieces

Learn how to create and print customized finger pieces by watching below.

Base

In this video, step by step instructions are provided to build the finger base attachment for the NeuroMaker Hand. Each action of the drafting process is here to follow along!

Once this item is drafted, this attachment will be connected to the distal and proximal finger attachments. This piece will allow your fingers to connect together on your new prosthetic!

Proximal Finger Base

In this video, step by step instructions are provided to build the proximal finger attachments for the NeuroMaker Hand. Each action of the drafting process is here to follow along!

Once this item is drafted and printed, this attachment will be modified to attach to the provided NeuroMaker Hand finger digits. These digit attachments will provide better control and grip functions for your prosthetic!

Distal Finger Attachment

In this video, step by step instructions are provided to build the distal finger attachments for the NeuroMaker Hand. Each action of the drafting process is here to follow along!

Once this item is drafted and printed, these finger modifications will be attached to the NeuroMaker Hand finger pieces. These adjustments will work with the proximal finger attachments to provide greater control and functions of your prosthetic hand!

Mid Finger Linkage

In this video, step by step instructions are provided to build the finger linkage pieces for the NeuroMaker Hand. Each action of the drafting process is here to follow along!

Once this item is drafted, this attachment will be connected to the finger attachments of your NeuroMaker Hand to provide stability. This piece will allow your fingers to connect together on your new prosthetic!